
EPFL related information
My Media
Add Media
Edit Media
Content Workflows
Playlists
Channels
Express Capture
Search
What is My Media?
My Media is your personal media storage. It is different for each user because it shows media you, yourself, have uploaded or created over time. The same My Media Page is available to you from each gallery/channel/course you are in across the various Kaltura applications. Items in My Media are private to you until they are published in one or more media libraries i.e. galleries/channels/courses. You can also add other users as collaborators on your media from within My Media.
My Media is your personal media storage. It is different for each user because it shows media you, yourself, have uploaded or created over time. The same “My Media” list is available to you from each channel/course, and items in My Media can be published in one or more channels/courses. Items in My Media are private to you until they are published somewhere. You can also add other users as collaborators on your media from within My Media.
How do I find My Media?
Select My Media from the User drop down menu.
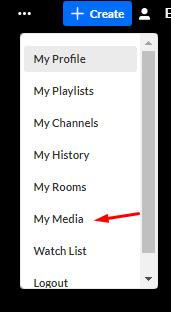
The My Media page displays.
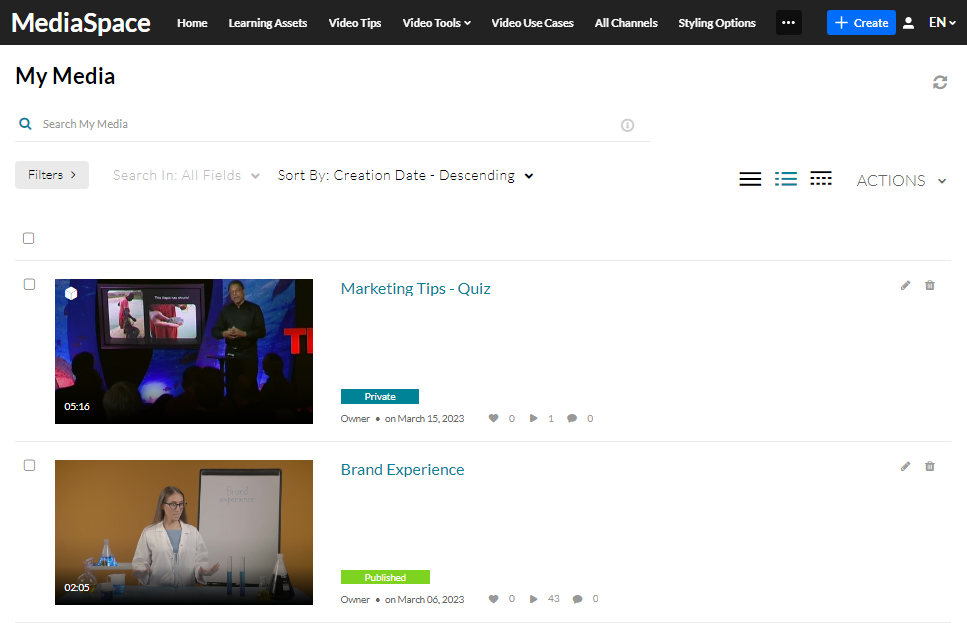
How to see where media is published?
For published media in the My Media page, click the green Published button to see where the media is published.
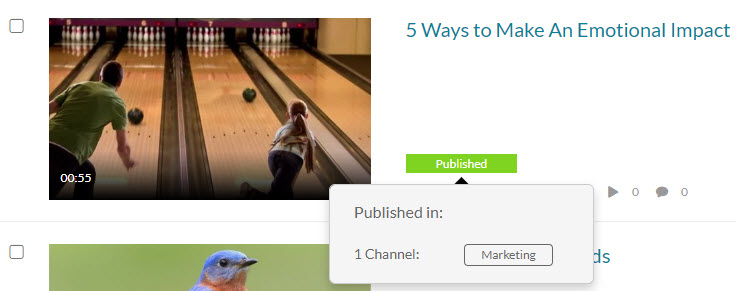
Click the green Published button again to close the pop up.
How to delete media?
To delete an entry choose one of the following methods:
- Access the My Media Page and click on the pencil icon to the right of the desired entry, then click Delete to confirm or Cancel to cancel the action.
- Access the Edit Media Page, click on the Details tab and click Delete Entry. Click Delete to confirm or Cancel to cancel the action.
How to edit media?
- Access the My Media Page. Your My Media Page lists previously uploaded media.
- Choose one of the following methods:
- Click the pencil icon next to the desired media.
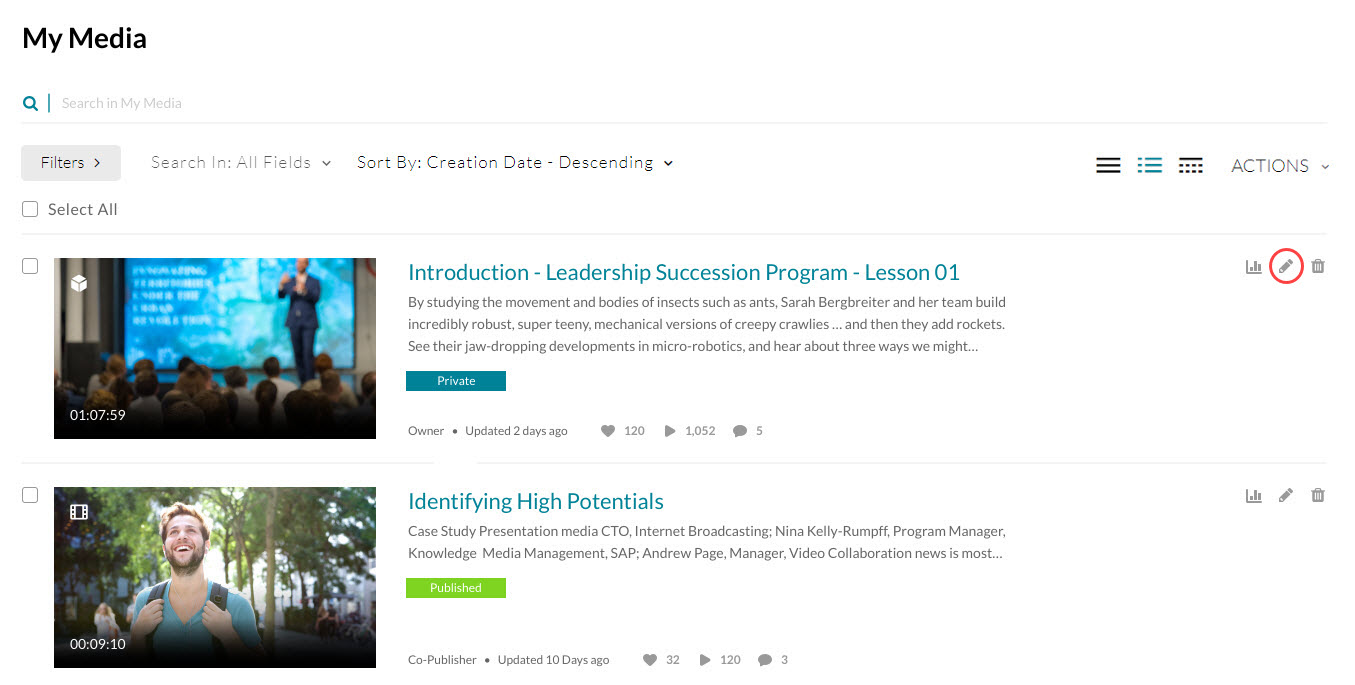
- Click on the thumbnail or title of the desired media, then choose Edit from the ACTIONS drop down menu.
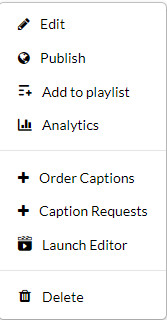
- Click the pencil icon next to the desired media.
How to publish media?
To publish one or more entries at a time.
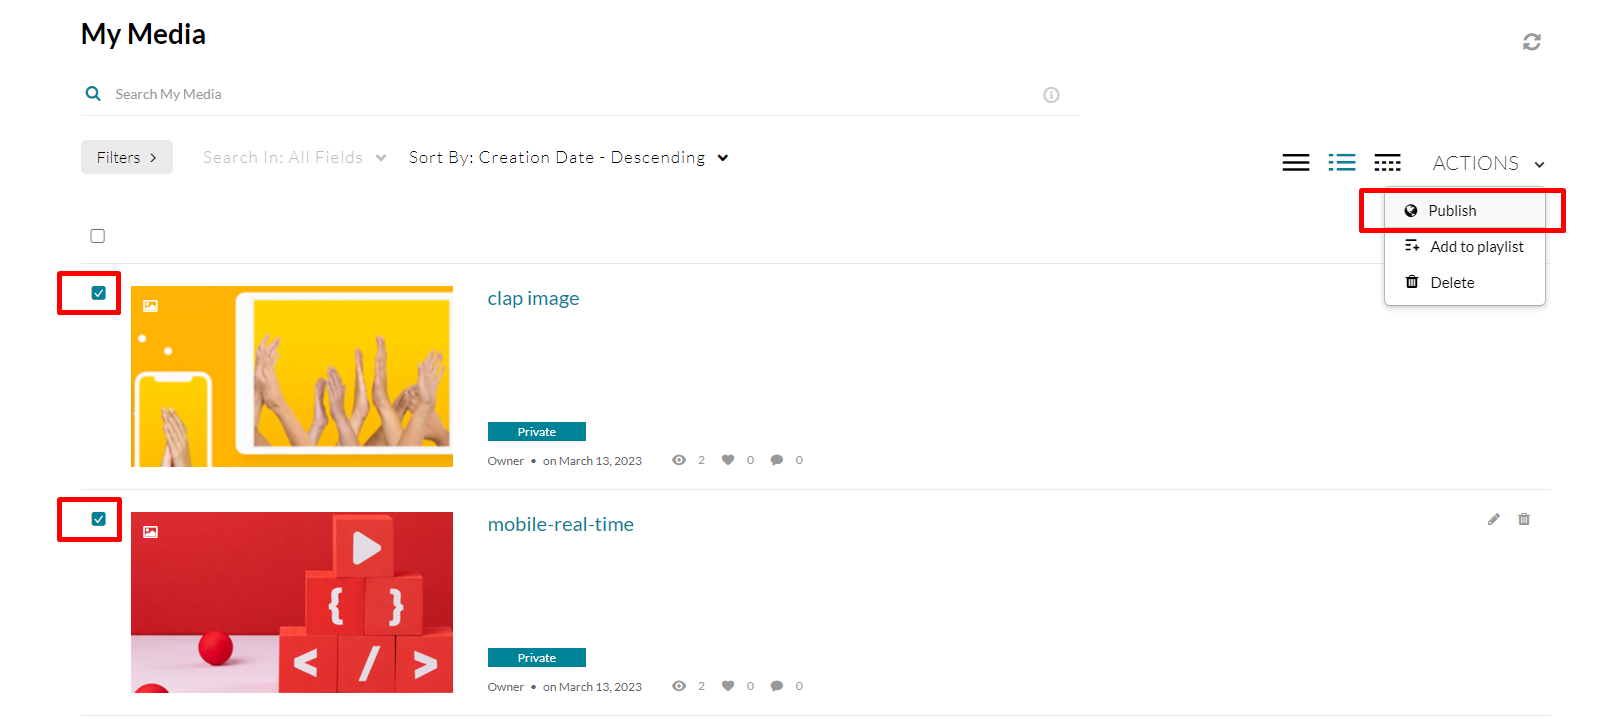
- Access My Media.
- Select a media item or multiple by checking the box next to the media item(s).
- Select Publish from the Actions menu.
 Set the Publishing status to Published.
- Select the designated channel(s) and/or gallery(s).
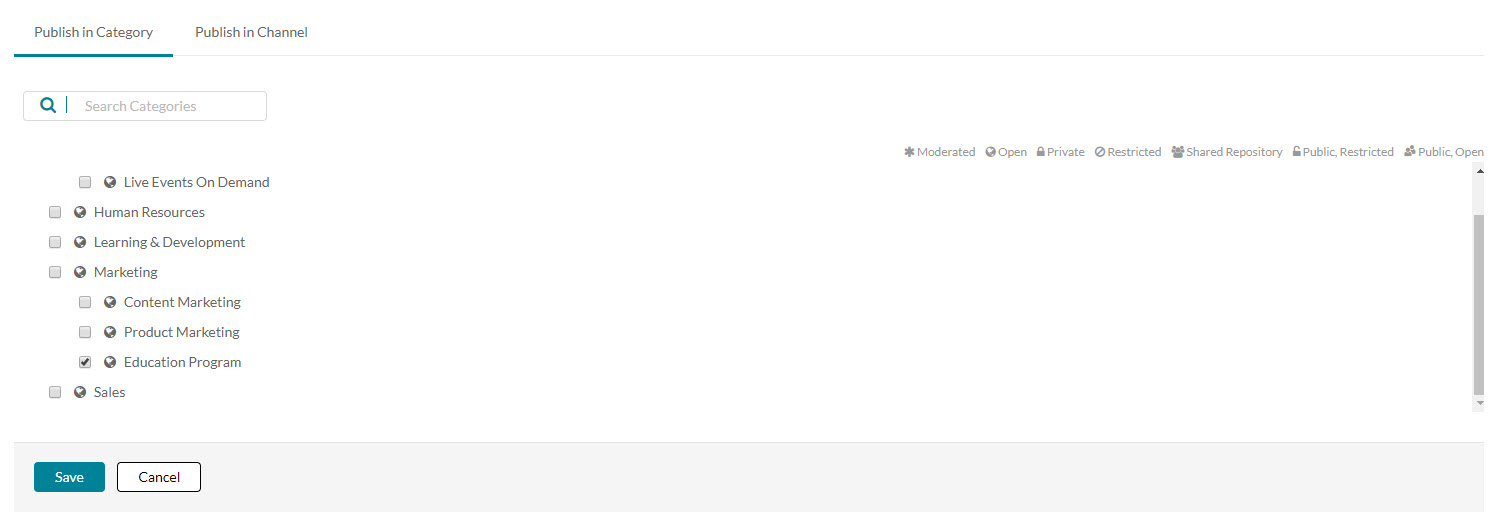
- Click Save.
 Set the Publishing status to Published.
How to upload media from your desktop?
1. Click the + Create button, and then select Upload.
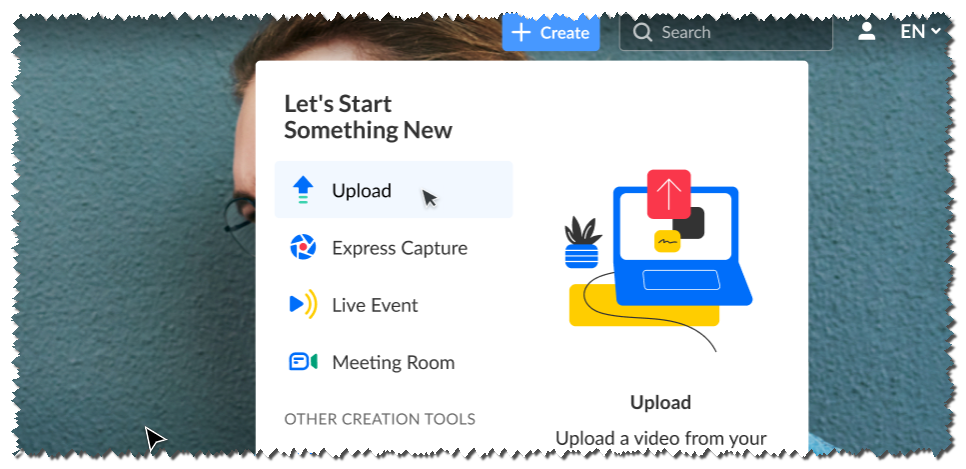
Depending on what is enabled in your environment, your + Create menu may look slightly different. If there is an option missing, please contact your Kaltura administrator to discuss how to enable it in your environment.
The Upload Media page is displayed.
Uploading Media Flow
2. To upload files click Select Files or drag and drop files into the dotted section.
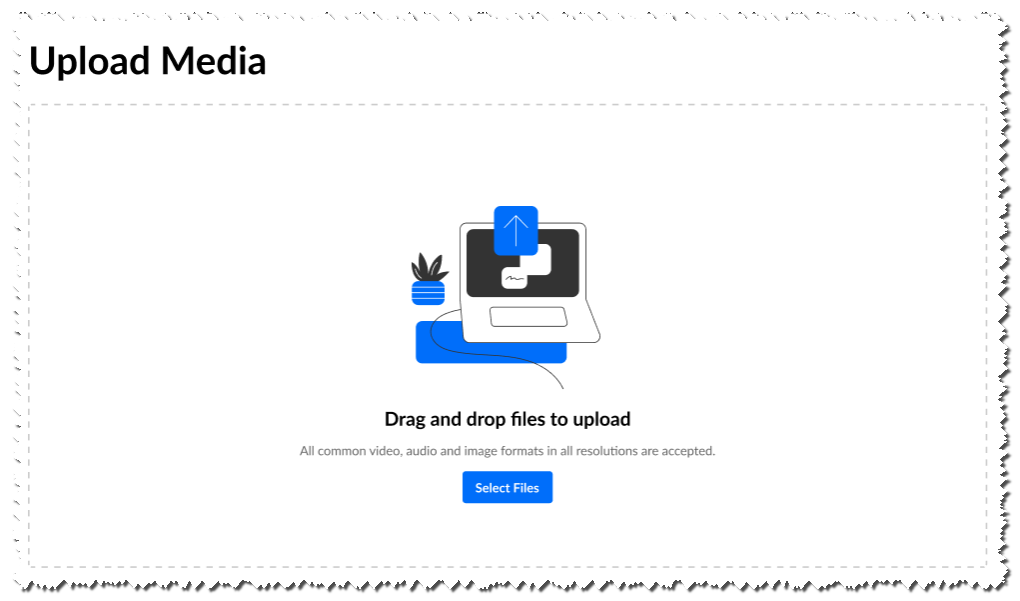
At this point, the upload process begins. If multiple files are selected, one file starts the upload process, and the rest of the files are then added to the queue.
How to upload a YouTube entry?
- Select YouTube from the Add New drop down menu.
The YouTube page is displayed.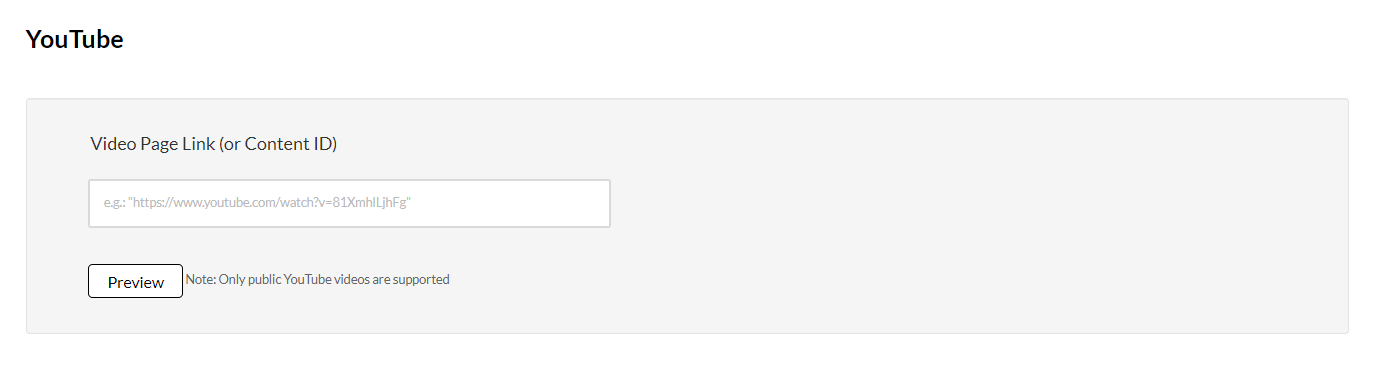
-
Enter the Video Page Link or the Content ID and click Preview.
To obtain the URL, right click on the video in YouTube and copy the URL. Only public YouTube videos are supported.
- Click Preview to edit the Youtube entry and enter metadata. Metadata includes the Name, Description and Tags.
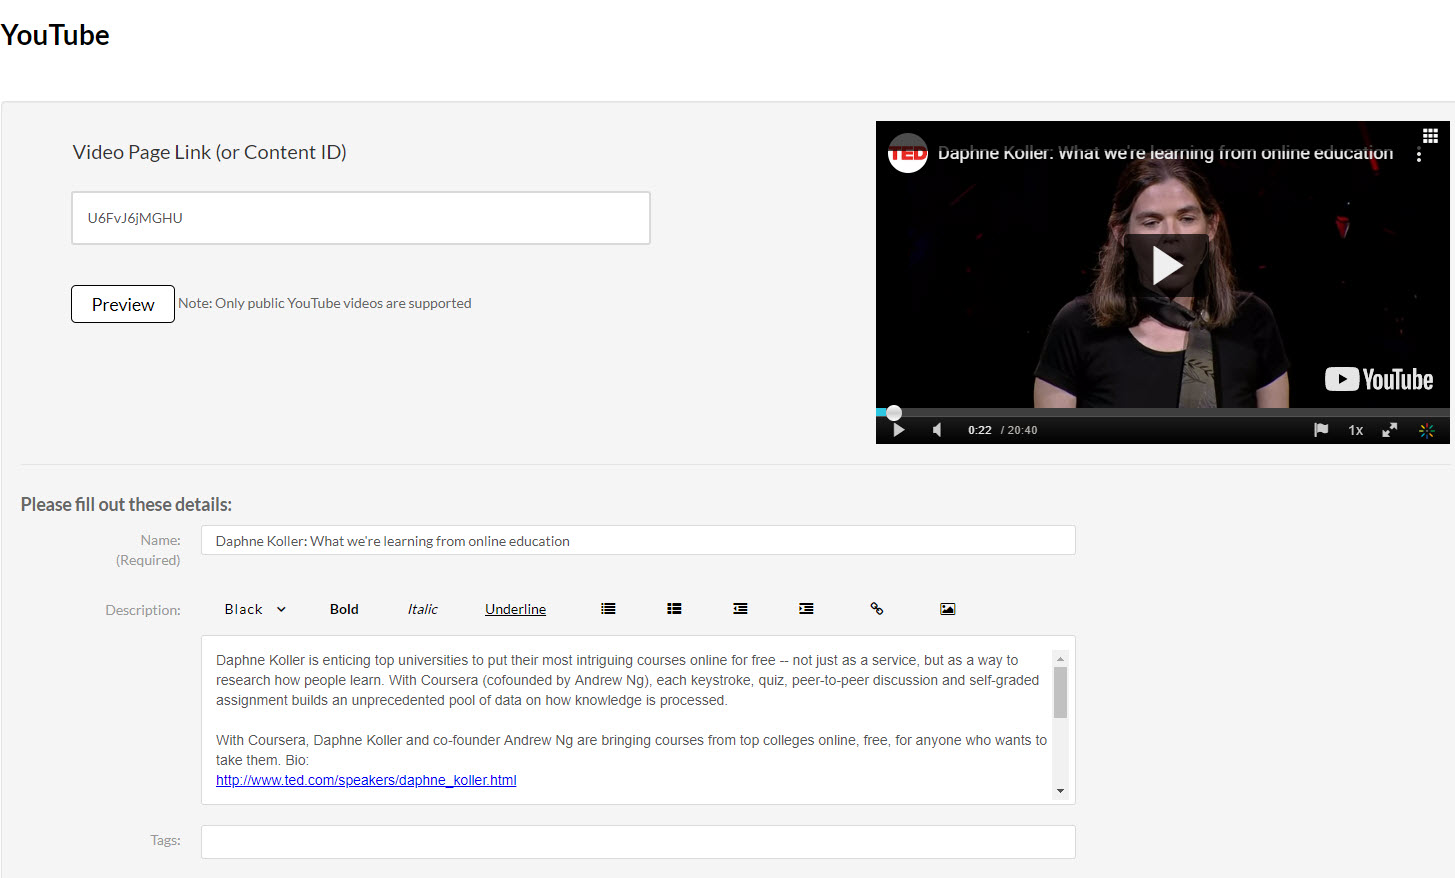
Depending on how your account is set up, there could be additional metadata fields to fill. Some of which may be required for publishing. - Click Save.
- Click Go to Media or Go to My Media.
How to create an Interactive Video?
To create an Interactive Video Paths
- Login to your KMS/KAF instance.
- Select Interactive Video from the Add New menu.
The Create Interactive Video window is displayed and includes two sections:
- Set Details - In the Set Details section enter a Name (required) and a Description (Optional).
- Add Media - Click on the Add Media arrow to open the My Media section.
My Media displays the media available to select to use for the Interactive Video. Click Add to videos to the Interactive Video.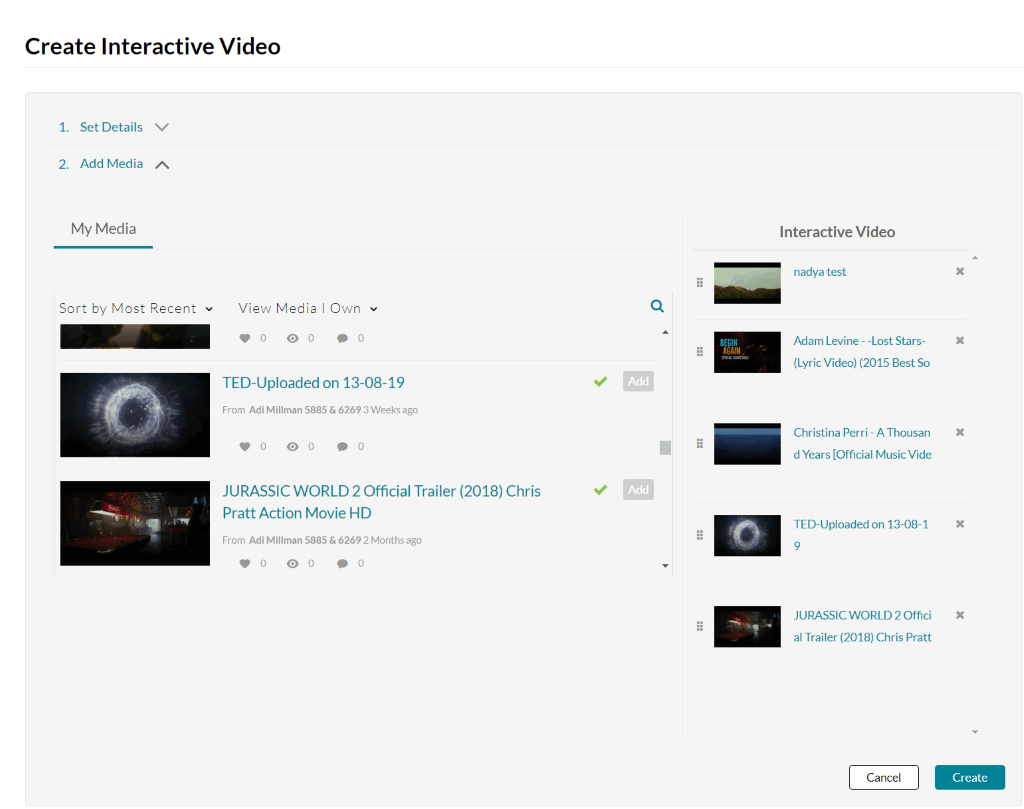
- Click Create.
How to edit an entry’s metadata?
- Access the Edit Media Page.
- Click on the Details tab.
- Fill in or modify the various metadata fields:
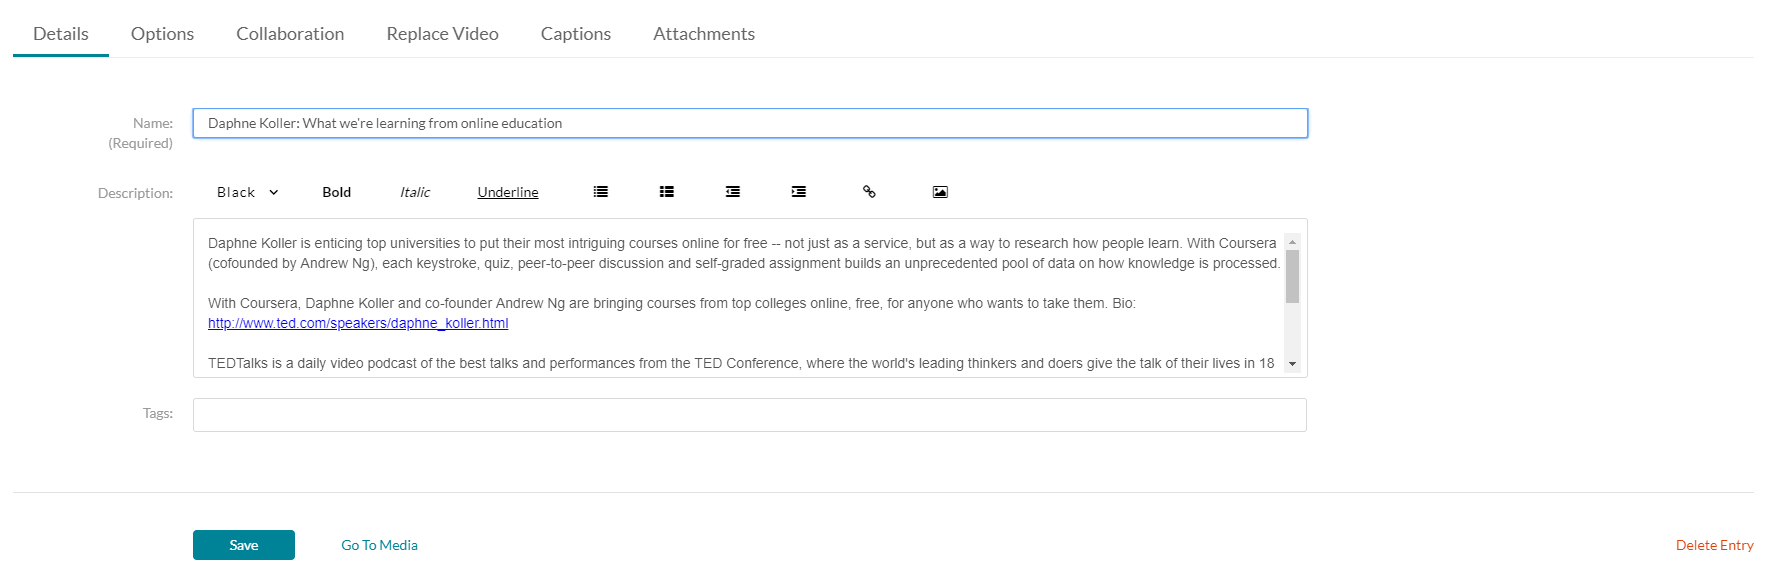
- Name - A name for your media item (required).
- Description - A description for your media item. Use the buttons above the text box to format the description text.
- Tags - Tags to identify your media item. For ease of use and to encourage tag consistency, as you type, suggestions are displayed based on tags already used in this account.
- Fill in additional custom metadata fields if available
- Click Save.
How to add collaborators?
- Access the Edit Media Page.
- Click on the Collaboration tab.
- Click Add Collaborator.
The Add Collaborator window is displayed.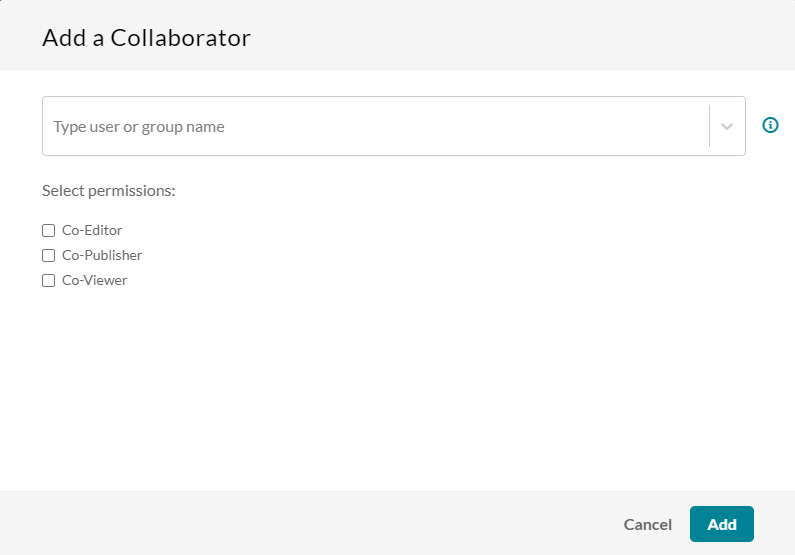
- Enter the collaborator’s user name or ID or the group's name or ID. You can add users/groups that are available on the site and you can use the auto-complete function (from 3rd letter and on).
- Check the type(s) of permissions for the collaborator you are adding to the media entry.
- Click Add.
- To view the collaborators’ permissions click View all Permissions and select the type of collaborator.
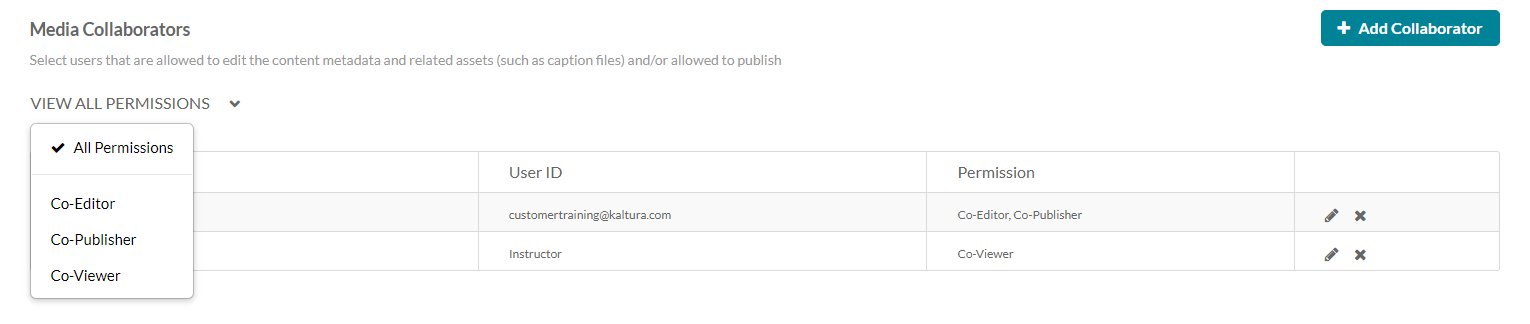
- Use the editing options/icons in the Actions column to edit/delete the collaboration options.
What files does Kaltura support?
MediaSpace supports a wide array of common audio and video formats. Below is a list of file types that you may upload:
Media File Formats: Mpeg-4 and QuickTime Formats (MP4, MOV, QT, and M4V), Flash Video (FLV and F4V), Microsoft Windows Formats (AVI, ASF, WMV and WMA), MPEG-1/2 (MPG, M1V, M2V, MP3), WAV, Matroska (MKV), OGG OGM & OGV, WEBM, 3GP, RM, Webex (ARF), MXF
Video Codecs: DivX (Div3/4/5, DX50), DV, H.263, H.264 and AVC,H.265, MPEG-4 Visual, MPEG-1/2, MJPG, MP42/3, IV40/50 (Indeo codecs), RV30/40, RMVB, FLV1/4, VP3/5/6/7/8/9, Sorenson (SVQ1/3), Xvid, Theora, WMV1/2/3, VC1, ProRes 422, ICOD, DVCPRO, PXLT, TCSS/TCS2, GoToMeeting Codec (G2M3/4)
What is the maximum file size I can upload for a single file?
MediaSpace does not impose a limit on the upload size. Keep in mind that larger uploads will take more time and consume more of your computer's memory during the uploading process.
How can someone else upload media for me?
You will have two options if someone is uploading media on your behalf. The channels feature in MediaSpace makes it possible for multiple users to share access to a media item on MediaSpace.
Keep in mind, however, that the person who uploads the media remains its owner. If the owner leaves, his or her media will eventually be removed. If you want your media to remain on MediaSpace longer than any particular individual, then we recommend uploading with a generically owned ID.
The second option is to have someone else upload the media and then change the owner. In this case the media is transferred to a different owner, as only one ID can have ownership of an item. Your collaborators can share media to you. If you are sharing media with another person, they will need to add you as a collaborator.
How do I change media ownership?
- On the 'My Media' tab, find the media item and select the 'Edit' button.
- Beneath the media, select the 'Collaboration' tab.
- Select the 'Change media owner' button.
- Enter the GT Username for the new owner.
- Select the individual and choose 'Save.'
How do I allow for co-editing or co-publishing?
- On the 'My Media' tab, find the media item and select the 'Edit' button.
- Beneath the media, select the 'Collaboration' tab.
- Enter the GT Username of the person you are adding as a collaborator.
- If you would like the individual to have editing rights check the 'Co-Editor' box and choose 'Add.'
- If you would like the individual to have publishing rights check the 'Co-Publisher' box and choose 'Add.'
- If you would like the individual to have both editing and publishing rights, select both boxes and choose 'Add.'
How can I change the thumbnail?
Access the Edit Media Page and click on the Thumbnails tab.
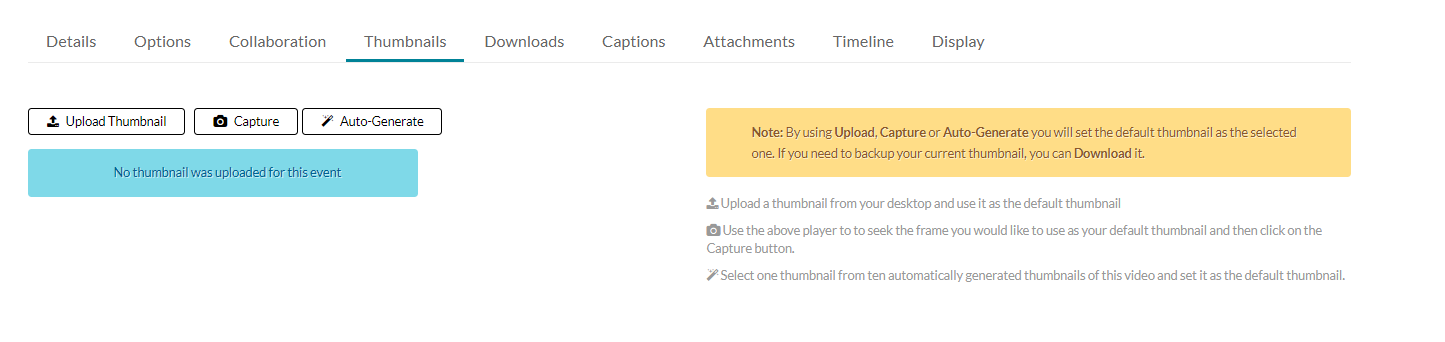
There are four options for setting and managing a thumbnail:
- Upload a thumbnail from your desktop and use it as the default thumbnail.
- Use the player to select the frame you want to use as your default thumbnail and then click on the Capture button.
- Select one thumbnail from ten automatically generated thumbnails of the selected video and set it as the default thumbnail.
- Download a thumbnail to back up your current thumbnail.
How can I generate embed code for an entry in MediaSpace?
- After the media loads, click the Share tab located underneath the media item
- Click on the Share tab, which will allow you to select one of the above:
- Link to Media Page: If you would like to share a link to a video you can copy the link. You will need to have the video set to Unlisted under the publishing settings. Alternately the media can be set to Published to either a public channel that everyone can view or an open channel which requires users to login with their UserID if you want to share the link to the video more widely.
- Embed: Embed code can be used to embed a piece of Kaltura media in a website HTML page or other online tool. After you click the Embed tab select the player and player size from the list of options at the bottom of the sharing tab. Finally you can copy the 'Embed Code' and paste it in your own HTML page or other online tool. Embed code overrides entitlements and publishing settings. Depending on where you use the embed code, it could make the media public to the world - be thoughtful about where you embed media.
- oEmbed: oEmbed code is often used for WordPress and Pressbooks. Click the 'oEmbed' tab and select the player skin and player size from the list of options at the bottom of the sharing tab. Finally you can copy the oEmbed link and paste it in your WordPress or Pressbooks page.
How to add chapters to a video?
- Access the Edit Media Page and click on the Timeline tab.
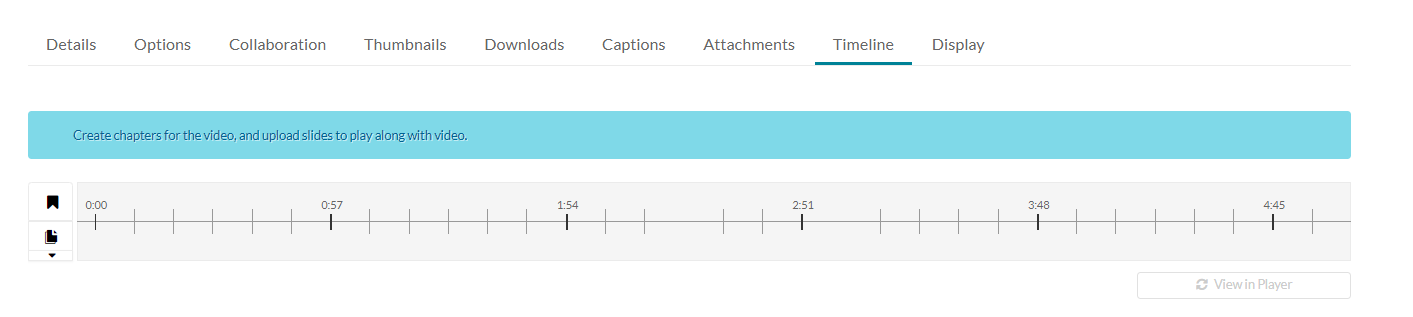
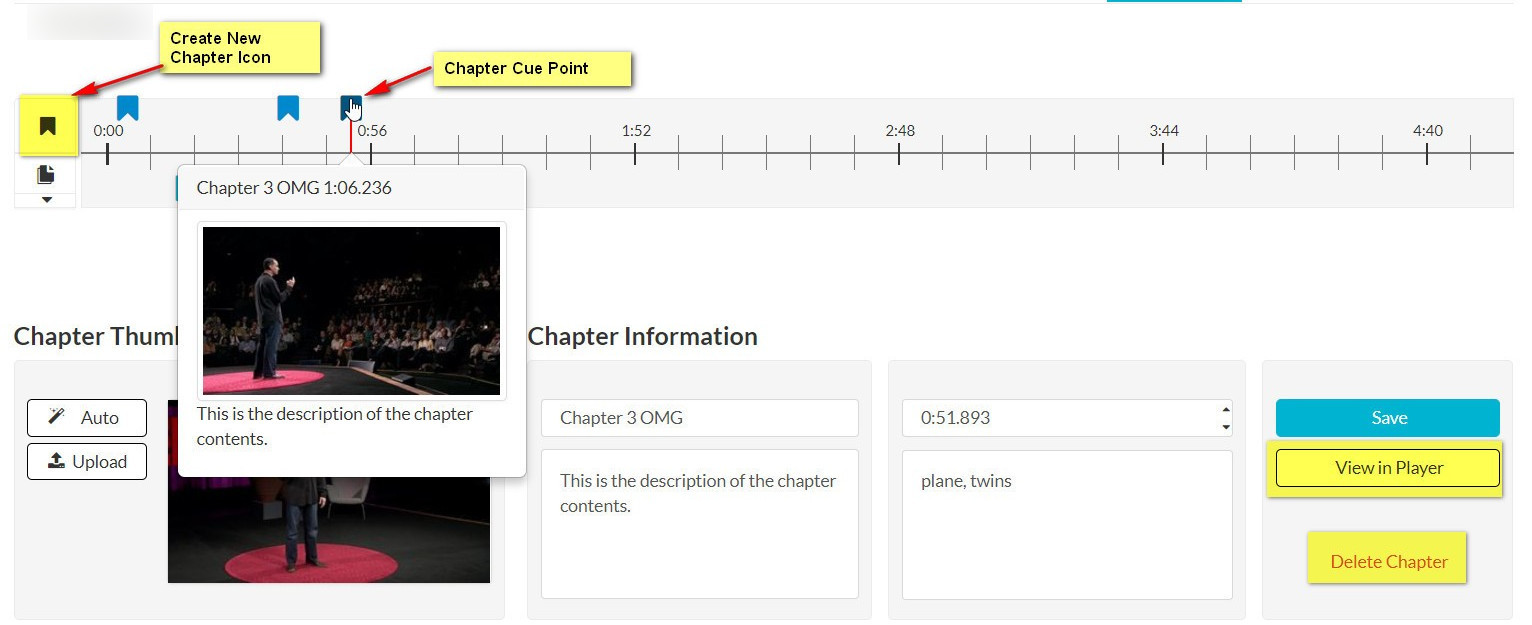
- Place the cursor on the timeline and click the Create New Chapter icon to create or update a chapter, or click on the cue point for the chapter you want to edit to view its properties.
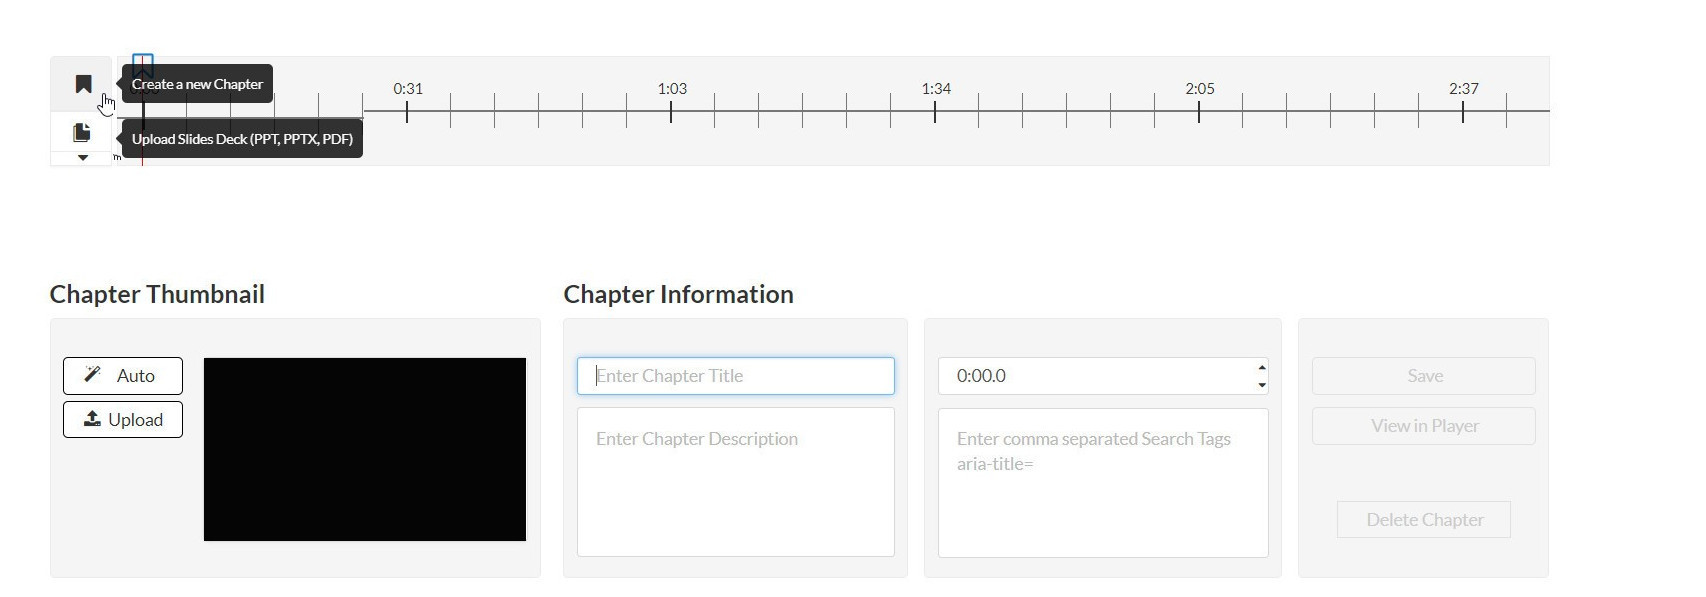
- After you create a chapter, you can:
- Add or modify the Chapter Title.
- Select a thumbnail. You can upload a thumbnail image for the chapter, or automatically create one from the video.
- Add or modify the Chapter Description (optional).
- Add Search Tags (optional).
- Click View in Player to see your changes.
How to increase page accessibility?
Click on the “Toggle contrast mode” located on the upper right hand side corner of the page.
If you do not see this option in your page, reach out to your Kaltura system administrator and ask them to enable this feature.

How to create Hotspots?
- Launch the Kaltura Video Editor and click the Hotspots icon.
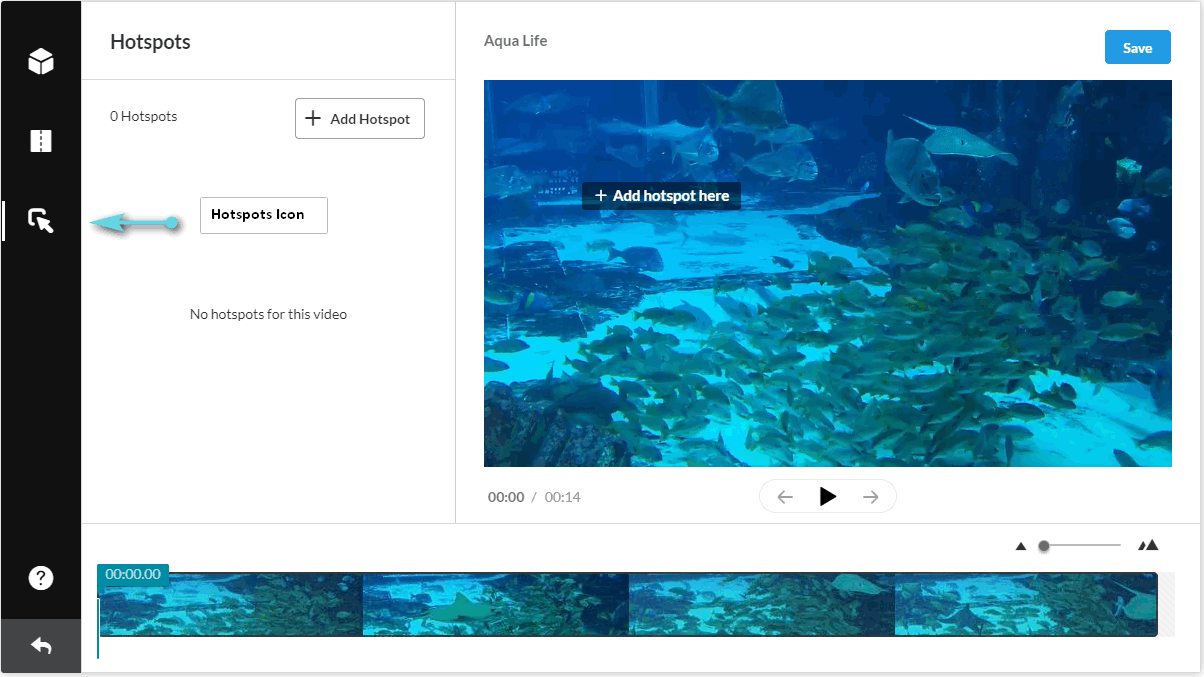
- Click Play. (Optional) You can place a hotspot right on the video start, or seek straight to a certain point. You can also click play and add the hotspot after pausing.
- Click +add Hotspot or hover over the player display area and click +Add hotspot here text. If hovering over the player, the hotpsot is created over the selected position when clicking. If you use the button (in the left pane) the default position is at the top left of the player. A hotspot is created at the selected time on your media.
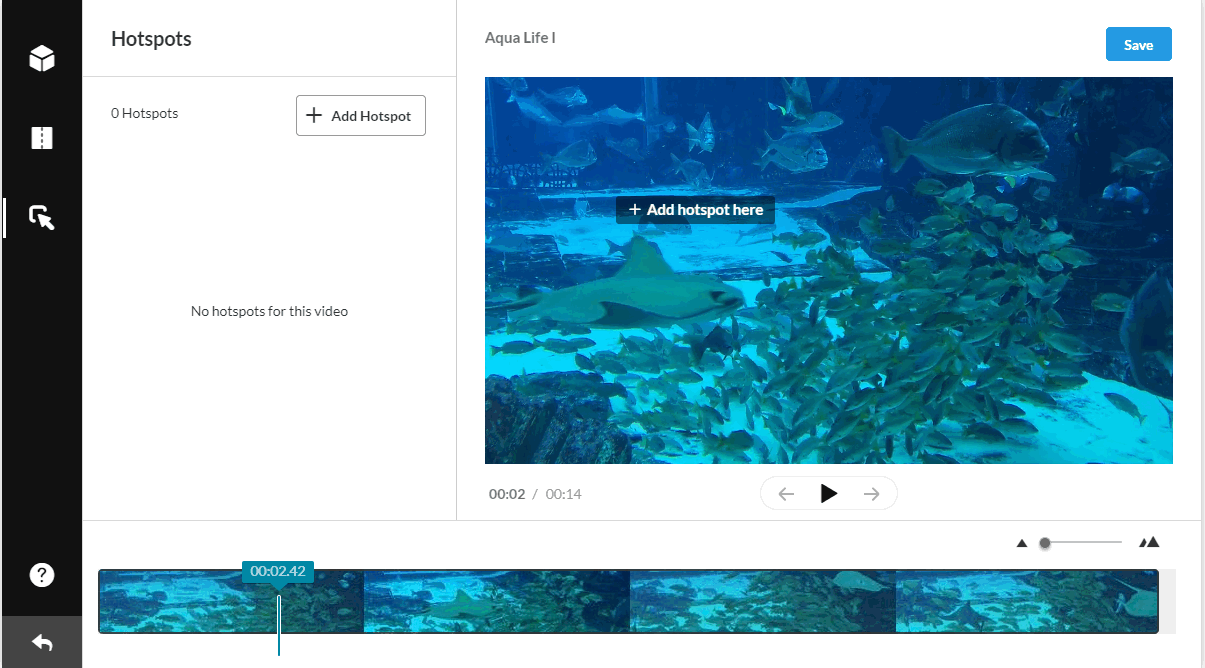
-
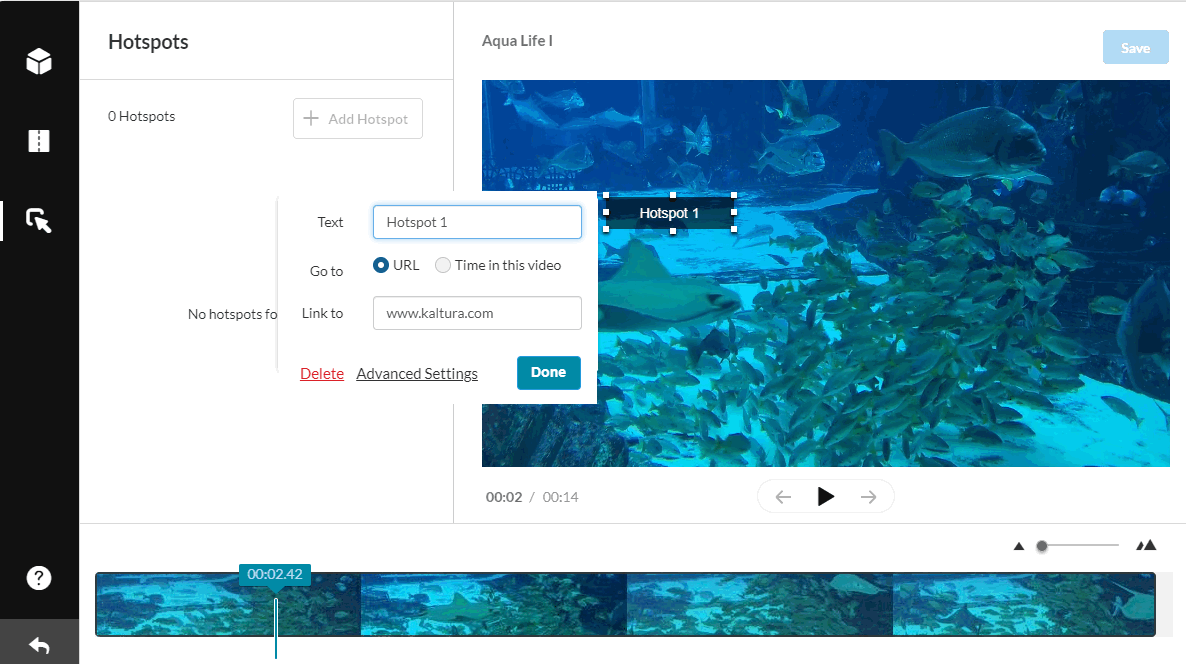
Create a hotspot. Enter Text for the Name of the Hotspot.
- Toggle Go to URL and enter a URL in the Link to field. Both Text and Link to fields are optional. You may want to create a transparent hotspot.
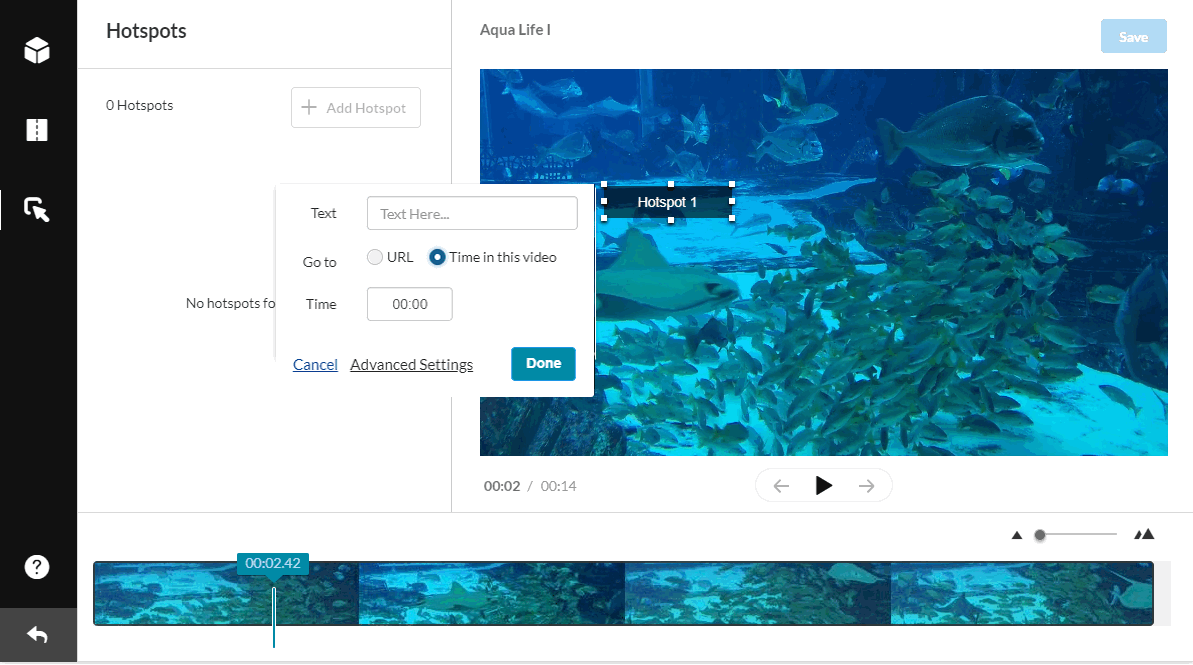
or - Toggle Time in Video. The Text field is optional. You may want to create a transparent hotspot.
- Toggle Go to URL and enter a URL in the Link to field. Both Text and Link to fields are optional. You may want to create a transparent hotspot.
- (Optional) You can drag and drop the hotspot to another location on the player. The position and size can later be accurately adjusted with keyboard input, using the Advanced Settings panel
- Click
Advanced Settings to modify the other settings, for example the display style and position for the selected hotspot.
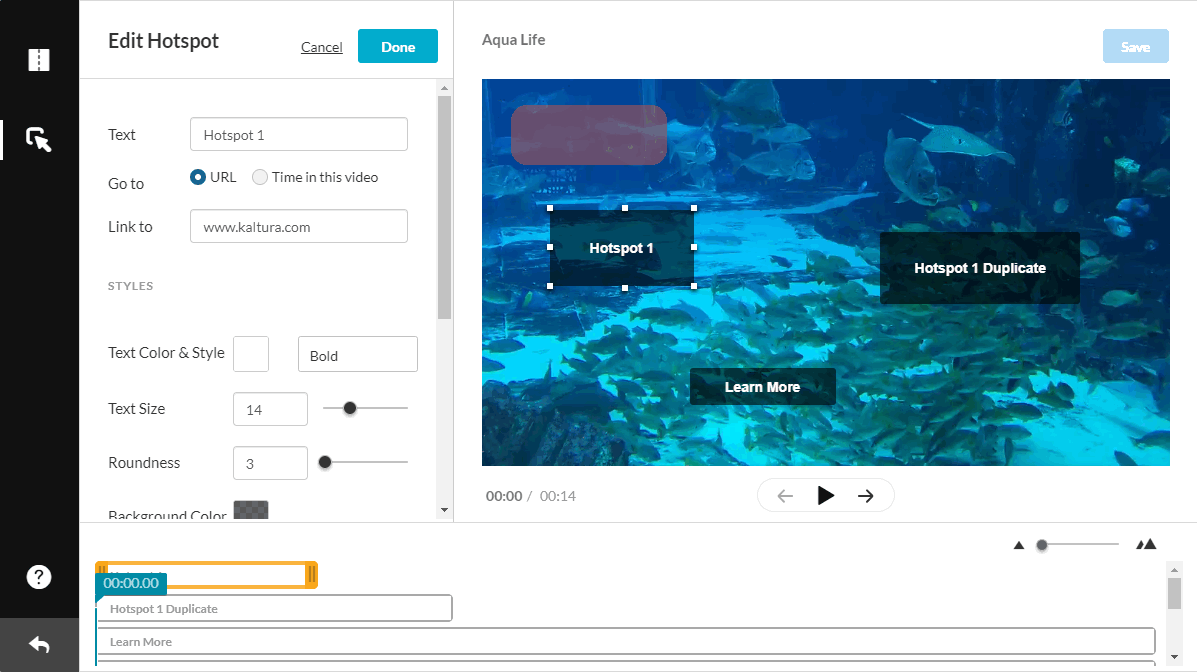
- Click on the box next to Text Color to open the color palette and change the text color and use the drop down to change the font weight.
- Use the slider to control the roundness.
- Select a background color from the Background pallette.
The following is an example of the Advanced Settings hotspots style change: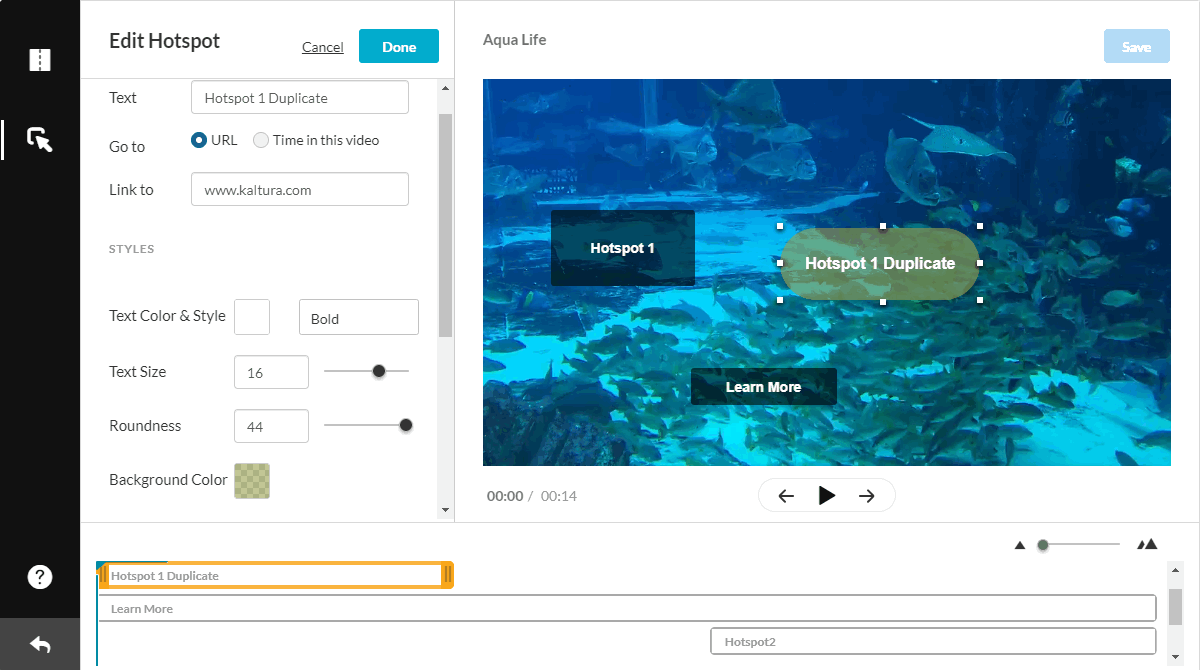
- Scroll down to set the position, size and start and end times for the selected hotspot. The position may be used to align your hotspots accurately on the display and depends on the player boundaries. The size is in pixels and should conform to your display screen configuration.
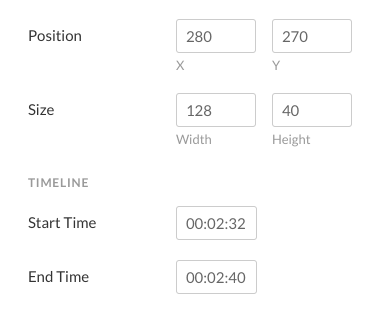
- Enter the Position in x y coordinates. The 0,0 point is the top left of the player.
- Enter the Width and Height. You can also resize the hotspot using the handlebars. See Resizing the Hotspot.
- Enter the Start and End Time for the selected hotspot.
-
Click Save to save your hotspots.
The hotspot is listed under your Hotspots list in the left pane. The duration of the hotspot is highlighted in the timeline in yellow with handlebars for editing. You can edit hotspots when creating them or after they are saved. There are several editing options. See Editing Hotspots.
How to Add Media to a Playlist in MediaSpace?
- From a Media's Entry Page select the entry you wish to add to the playlist or access yourMy Media page and check the box(es) to the left of at least one media you would like to add to the playlist.
- Select Add to Playlist from the ACTIONS drop down menu. Additional functionality displays.
To create a playlist
- In the Create new playlist field, type a name for the new playlist.
- Click Create. The newly created playlist is shown in the list.
To add media to an existing playlist
- Click to choose a playlist from the list.
- After you have made your selection, click Save. A message displays that this media was added to the playlist.
You can also add media to a playlist via the Edit Playlist Details Page
- Access the Edit Playlist Details Page.
- Click Add to Playlist button – this will launch the Library display.
- In the Add Items to Your Playlist section, you may change the library.
- Select My Media or All Shared Content (equivalent to a global search in MediaSpace).
- Type search criteria in the Search field and click Enter.
- Check the box(es) next to the name of the playlist(s) to which you want to add the media.
- Click Done. The selected media has now been added to the playlist(s).
How to Access the Playlist Playback Page?
- In MediaSpace, choose My Playlists from the drop-down menu at the top right.
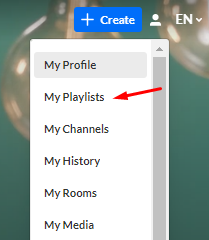
- From the My Playlists page, click on the thumbnail or name of a playlist.
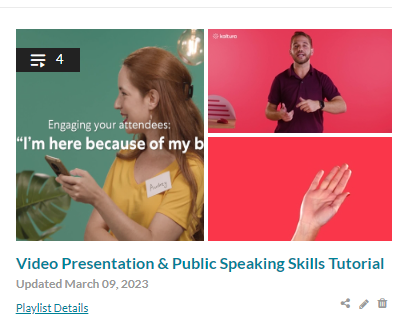
- The Playlist playback page displays.
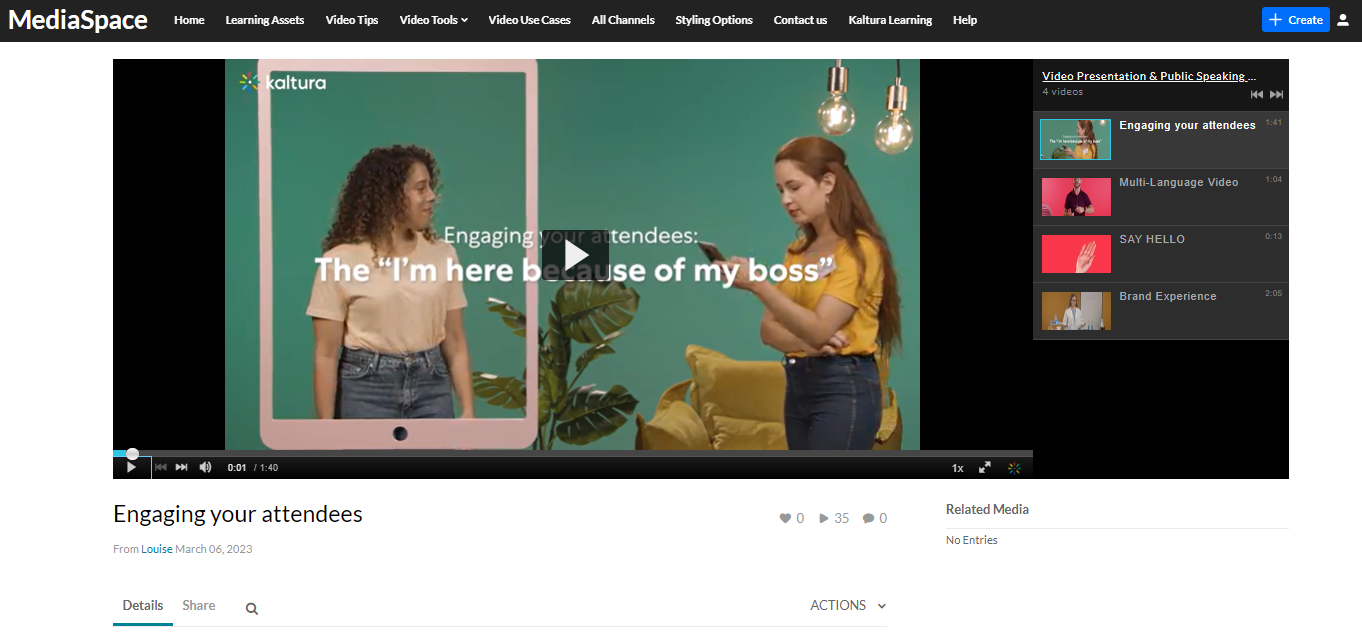
How to Access the My Playlist Page?
In MediaSpace, select My Playlists from the User drop down menu. The My Playlist page displays.
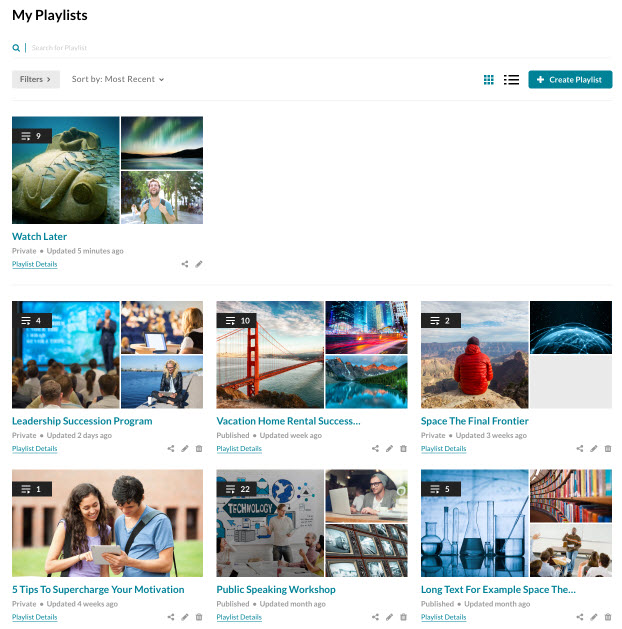
The My Playlist page allows users to see all available playlists and create new playlists directly from this page by clicking on the Create Playlist button. See Create and Add Media to a Playlist from the My Playlists Page.
How to access the Playlist Details page?
Option 1:
Access the My Playlists page and click Playlist Details under the desired playlist.
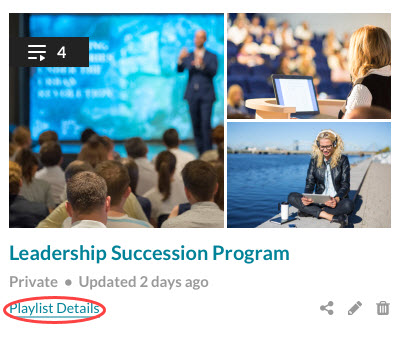
Option 2:
Access the Playlist Playback page and click on the name of the playlist (underlined at the top right of the page).
How to replace media?
- Access the Edit Media Page.
- Click on the Replace Media.
Replace Media screen displays.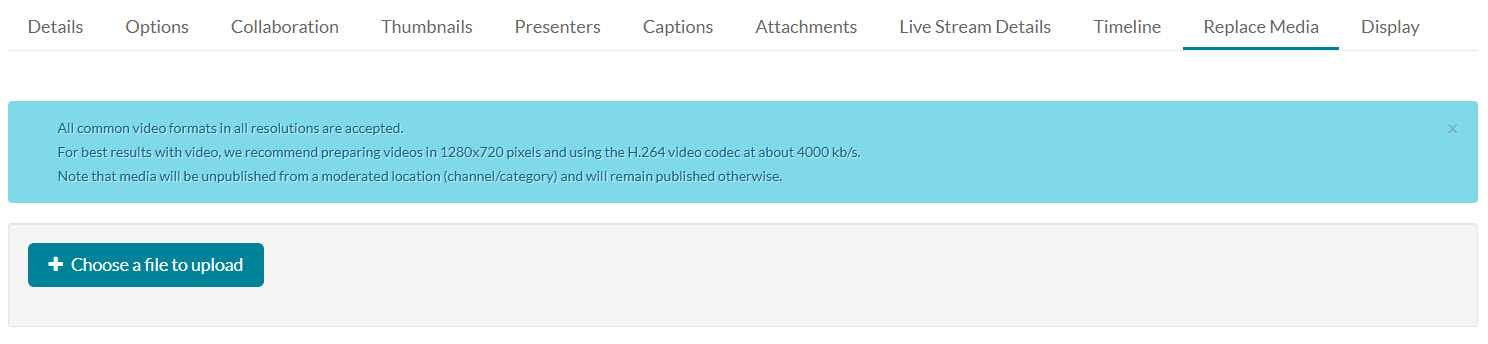
- Click Choose a file to upload and follow the prompts. Replace Video screen displays.
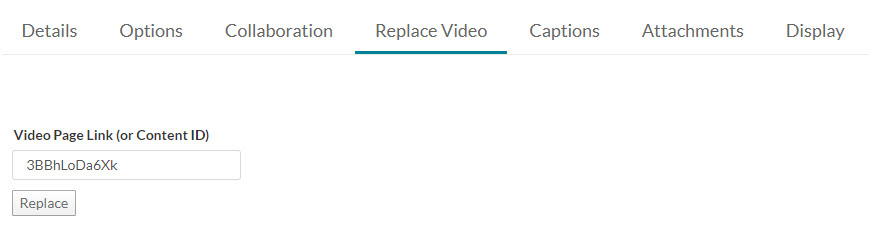
- Type link or Content ID and click Replace.
- After the upload is complete, click Approve Replacement to approve, or Cancel Replacement to cancel.
How do I view Analytics
Kaltura Video Analytics gives you a window into your audience engagement and your video streaming quality of service. Get detailed dashboards that give actionable insights on engagement and video usage.
There are two ways to access Entry Level analytics in KMS.
Option 1:
- Choose My Media from the User drop down menu.
- Click the View Analytics button next to the desired entry.
Option 2:
- Choose My Media from the User drop down menu.
- Click on desired media entry.
- Choose Analytics from the ACTIONS drop down menu.
To access Entry Level analytics in KAF
- Choose My Media from the list of external tools.
- Click on desired media entry.
- Choose Analytics from the ACTIONS drop down menu.
How can I export data?
All Kaltura MediaSpace analytical data can be exported using the “Export to CSV” option. You can also opt to use the “Printable Version” to print the data.
What is the difference between plays and views?
While plays are counted the instant the play button is clicked, the views refer to player impressions; The viewer made it to a page where the video is available, but didn't necessarily hit “Play”
What is the entry drop-off?
The drop of refers to the percentage that the viewer made it through a video (i.e. if viewer watched 2 minutes of an 8 minute video, the dropoff is 25%).
Current analytics track dropoff by quartiles - 0%, 25%, 50%, 75%, 100%. The scrubber must pass one of those quartiles in order to be counted. (i.e. if a viewer watched 1:55 of an 8 minute video, the dropoff is 0%)
What is the Engagement Funnel?
The engagement funnel shows the viewer journey, from discovery to viewing the entire video. The following metrics are shown in the funnel:
- Player impressions
- Plays
- Plays that reach <x%> percent play through - this can be selected by the user.
What is the User Engagement Heatmap?
For each user, by clicking the arrow next to their name, you can view a heatmap indicating which part of the video they watched. It is also possible to watch the entire user list heatmap to better understand the specific video trend, what part was interesting and which not so much.
For each user, 4 tiers are available to analyze their engagement on the duration of the entry:
- Not viewed - this section wasn't viewed by the user
- Viewed once - this section was viewed once by the user
- Viewed twice - this section was viewed twice by the user
- Viewed more than 2 times - this section was viewed more than two times by the user


What can I learn from Metrics Over Time?
To explore engagement trends over time, use the graph to review key metrics:
- Number of plays
- Number of unique viewers - number of authenticated viewers, all anonymous viewers will be counted as a single viewer
- Number of minutes viewed
- Average completion rate - how much of the video was watched
- Average drop off rate - measured by viewer reaching playback quartiles
You can view the data for each metric in daily or monthly granularity. Hover over any point in the graph to see the detailed data. You can also compare to another metric by selecting another metric from the drop down list.
To change the time period or filter the data, use the date picker and filter panel at the top of the dashboard. You can also compare data from different time periods.
How do I Search by Published Media?
- Search for all published media by entering keywords into the search bar at the top of the page. Search results are limited to media publicly published by the college or from the Channels area within MediaSpace.
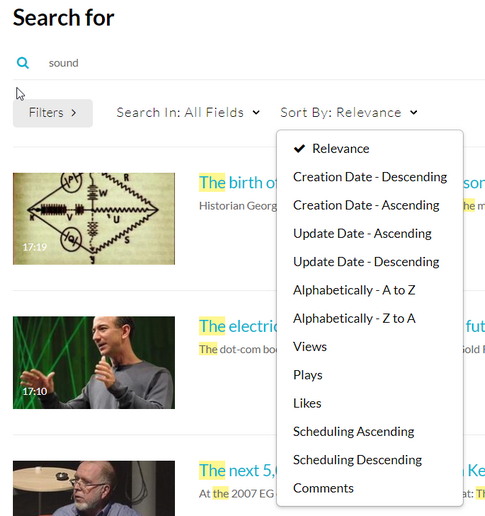
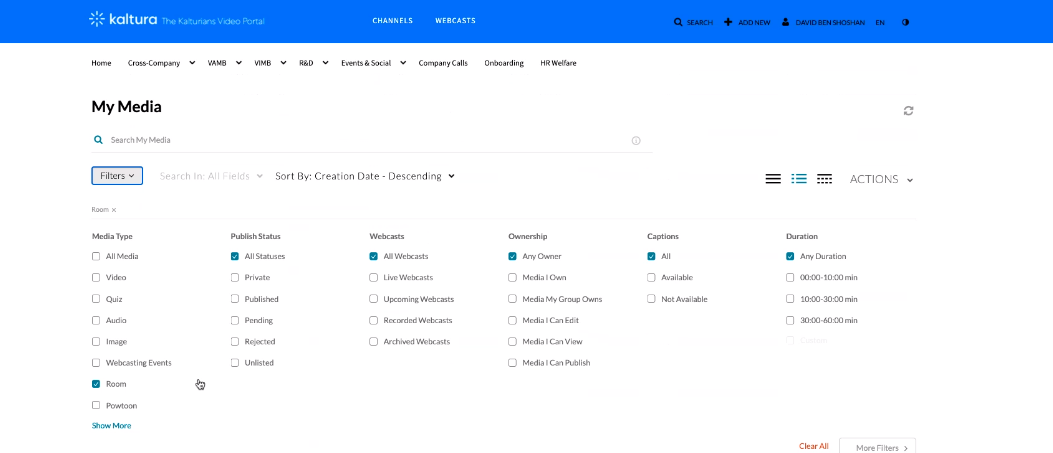
- Sort your search results by multiple fields or by media format (video, audio, etc..).
- Filter your search results for keywords within all metadata, video captions, channels or categories.
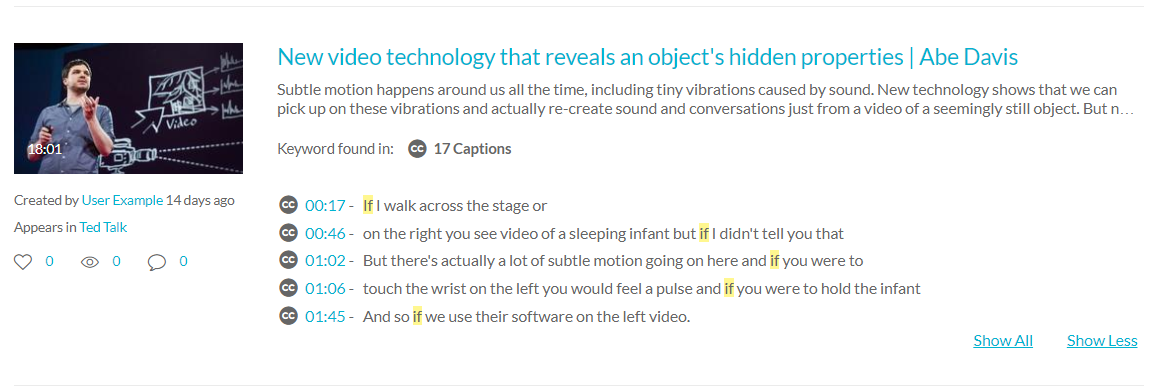
- If the result is located in the captions, slides, chapters or tag, you are able to click on the “Show More” option and learn more about exactly where is was used.
- To clear the search text, click on the X in the search field.
What is the new eSearch?
A new Kaltura search API that will revolutionize how video search is done. Leveraging the Elastic Search engine, eSearch exposes a set of API actions that unlock a variety of search capabilities and simplify how video search is done.
Using the new search mechanism will return more results, showing hits in fields previously not searched, resulting in greater expose to these videos.
How to Search My Media?
- Search for your own private media by clicking on the My Media link at the top of the page and entering keywords into the search bar near the page heading.
- To clear the search text, click on the X in the search field.
Search Behavior
- Search criteria may include alphanumeric as well as special characters such as: `, ~, !, @, #, $, %, ^, *, (, ), -, _, =, +, [, ], {, }, ;, :, ', \, |, /, ?
- The following special characters are not searchable: &, <, >. For example, searching for "hello&world" will not yield any results.
- The character “/” is not searchable and ignored by the system. For example, searching for the date 1/1/2015 searches for the string 112015
- The character '+' is treated as the spacebar - and is used as the AND search operand.
- The spacebar is treated as an AND search operand. For example, searching for ”hello world” will result with all entries that include both hello and world in one of the searchable entry attributes.
What is the “In video search”?
Kaltura offers the following three approaches to looking / Searching “inside” video. In-video search makes it much more discoverable, and thus far more useful and valuable:
- Manual and automatic captioning, as with our Kaltura REACH offering
- Automatic indexing of textual content inside video, for example a presentation
- The ability to ‘mark’ specific spots in a video with a title, description, and tags
These in-video search techniques make it easier for users and content owners to engage with content.
How do I access My history?
Users who have logged in to MediaSpace can quickly access recently-viewed media with My History.
After logging in to MediaSpace, users will find the option for My Media in the menu under their name, in the upper-right corner (in the same place that they access My Media).
Partially viewed videos will display with an orange progress bar under the thumbnail, and will automatically start where they left off. A video that was viewed to completion will have a blue progress bar under the video thumbnail.
How do I publish to a channel?
There are several ways to publish entries to a channel.
The first, would be adding a video from the channel page:
- From MediaSpace click on the User Menu > select My Channels.
- Click on the Channel that you want to add content to.
- Click on the Add Media button.
- Select the content you want to add to the channel and click Publis
The second would be adding the video to a channel from the entry page:
- From the media page, click on the publish option
- Select to which channels you wish to publish the video to
- Click on the Publish button.
What is User & Permissions?
| Permissions / Permission Levels |
View Content and Category | Add Remove Content to Category | Approve Content added to the category | Edit Category’s settings, privacy options and user permissions | Remove Category |
|---|---|---|---|---|---|
| Member | X | ||||
| Contributor | X | X | |||
| Moderator | X | X | X | ||
| Manager | X | X | X | X | X |
What are Privacy settings?
| Privacy Setting | Category | Channel |
|---|---|---|
| Open | Anyone can view content (including anonymous users), but only admin role users and category members can contribute content. | All logged in users can view content, but only admin-role users and channel members can contribute content. |
| Restricted | All logged in users can view content, but only Category members can contribute content. | All logged in users can view content, but only channel members can contribute content. |
| Private | Only Category members can view and contribute content. Note: Sub categories under a private category will be visible only to members of those sub categories. | Only channel members can view and contribute content. |
| Shared Repository | N/A | Only channel members can view and contribute content; content may be published to other channels, according to publishing entitlements. |
| Public | N/A (The content in categories is publicly visible when categories are set to "Open".) | Anyone can view content (including anonymous not logged-in users). Only channel members can contribute content according to their publishing entitlement. |
How do I create a Channel?
- From MediaSpace click on the User Menu > then click on My Channels.
- On the My Channels page > click Create Channel.
- The Create a New Channel page is displayed.
- On the Create New Channel page enter values for:
- Name: Enter the channel name to display on the Channels page.
- Description: Enter a summary of the channel content to display on the My Channels page.
- Tags: Enter a descriptive tag to use in searches.
- Select the channel Privacy Settings.
- Open: All logged in users can view and contribute content (contribution is not allowed for viewer-role users).
- Restricted: All logged in users can view content and only channel members can contribute content
- Private: Membership is by invitation only and only members can view content and contribute content.
- (Optional) Select the options settings for the channel.
- Moderate content (Media will not appear in channel until approved by channel manager.)
- Enable comments in channels.
- Enable subscription to channel
- Click the Save button.
How to manage channel media?
In the Add Media to a Channel page you can add existing media or upload new content to the channel.
- From MediaSpace click on the User Menu > select My Channels.
- Click on the Channel that you want to add content to.
- Click on the Add Media button.
- Select the content you want to add to the channel and click Publish.
How do I moderate a Channel?
Channel managers and moderators approve or reject content when a channel manager's approval is required before media is displayed.
To moderate channel content
- On the Channels icon, click on Edit.
- In the Edit channel name page options section, select Moderate.
- Click Save.The channel is now moderated. If content is uploaded to the channel the status will be pending approval.
Note: If media is waiting for moderation, you cannot preview or publish it until it is approved. You can edit media information while waiting for moderation.
To approve content that is pending
- Go the My Channels page.
- Click on the pending link on a channel that has media pending or on the Channel page click Browse Pending. The browser pending media window is displayed.
- Click Approve or Reject. Approved content is displayed on the channel page. Rejected content will not be added to the channel.
How do I Delete Channel?
- On the My Channels page, click on Edit.
- From the Edit Channel page click Delete.
- Click Delete to confirm the deletion.
Note:Deleting a channel does not delete the media from MediaSpace, but channels deleted cannot be restored.
How to install the Kaltura Personal Capture??
- Log into Kaltura MediaSpace.
- At the top right, click Add New, and then select Personal Capture.
- If your browser prompts you to approve the download, select whichever option allows the download to proceed.
- When the download is complete:
- In Windows, click the Personal Capture installer, and then follow prompts to complete the installation.
- In macOS, drag the Personal Capture icon to the Applications folder.
- When the installation is complete, return to MediaSpace; then, to launch the software, click Add New, and then select Personal Capture again.
How to record with Kaltura Capture?
- Click the red button to start recording.
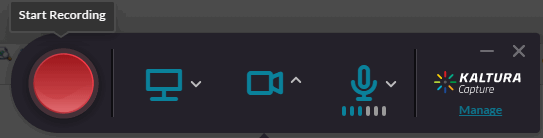
To see other recording options, see Kaltura Capture Recording Options.
You will see a 5 second count down and then your recording will start. - If you decide to cancel your recording during the 5 second countdown, click Cancel.
When the recording begins, the duration of your recording is displayed in the Recording Menu.
How do I complete the work needed to upload a basic recording?
After you "stop" your recording you will be directed to the entry page. If you clicked stop by mistake, you can always click Cancel and you will be returned to your recording in a paused state. If you want to complete the recording, enter the following information and click save:
- Title of the recording.
- Description
- Tags
Select one of the following options:
- Delete to delete your entry.
- Save and Upload to upload to Kaltura MediaSpace or your KAF application.
- Save to save to your local Library only. You will be able to Upload at a later time from your media library.
- Start a new recording - you will be prompted with a confirmation that you indeed want to leave.
- Playback your recording.
When you Save a recording without uploading it, the Management window opens with the Edit tab and displays the options to Upload or Detete your media. You can also select Delete all uploaded to delete all uploaded media files from your local storage.
Click Upload. A pending status is displayed and a successful upload message appears when the upload is completed.
How to save and upload Your Recording?
After you “Stop” recording, a message will appear, letting you know the recording was completed and saved successfully.
At this point, the seamless process of uploading your recording to MediaSpace will start.
The final message of the process, will let you know that the that your recording was saved in your local folder successfully.
All the recorded videos are stored locally in your Recordings directory. If you have not changed the Recordings directory during the installation, the default recording directory is C:/ProgramFiles/Kaltura/Capture/Recordings.
Adding to the above, your recording are automatically uploaded to your Kaltura account (to the user specified in the “User ID” field in the Recording Details screen).
Upload is done in the background regardless of the user that is logged in. After you save your recording, you can start a new one or log off and the recording will continue to upload.
When you Click Here in the successful upload screen, you are automatically directed to your Kaltura Mediaspace instance.
How to delete old recordings?
AWhen a recording stored locally is no longer needed, you can delete it using the following steps:
- open the application.
- Click on the Manage option.
- Locate the recordings you wish to delete.
- Click on the delete option and confirm the action.
How to change the pre-recording settings?
To change the application’s pre-recording configuration, follow these steps:
- Open the application.
- Click on the manage option and go to the settings tab.
- In this page, you are able to configure camera and screen quality, as well as the recoreding name prefix and additional fields
What is Kaltura MediaSpace?
Kaltura MediaSpace is the company's market-leading social video portal. With MediaSpace, users can securely create, upload, share, search, browse, and watch live and on demand videos, presentations, screencasts, and other rich media content, anytime, anywhere.
How to login to MediaSpace?
Logging in to MediaSpace depends on your MediaSpace configuration. The different login displays depend on whether your site is configured to allow anonymous users to access your portal or not.
Logging in as an Anonymous User:
- On the MediaSpace home page, choose Login from the GUEST drop down menu.
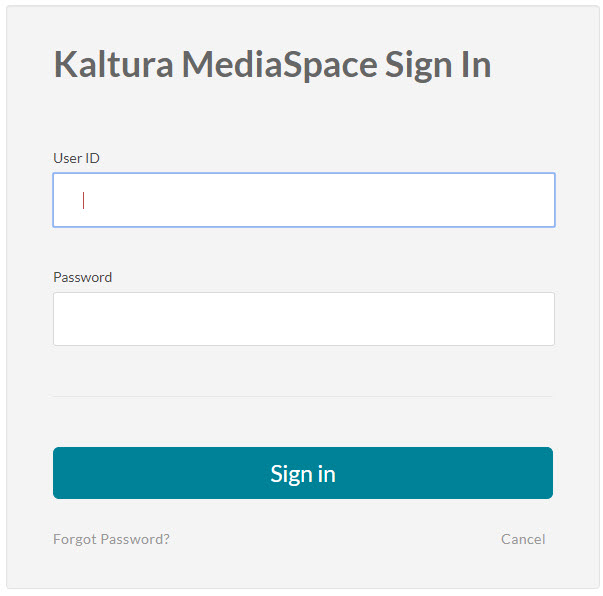
- In the Login window, enter your username and password.
- Type your User ID and Password in the appropriate fields. If you forgot your password, click Forgot Password. This redirects you to your email application where by you can request help.
- Click Sign In.
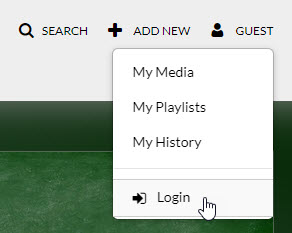
Note - You will also be prompted to login when choosing My Media, My Playlists, My History, or My Channels from the GUEST drop down menu, when selecting Restricted Channels/Galleries or a Direct Link – Depends on your admin’s configuration and the resource you are trying to access.
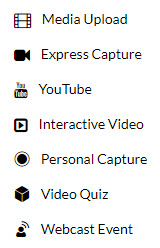
What media creation tools are available in MediaSapce?
Depending on what is enabled on your environment, your + Add New menu may look slightly different. If there is an option missing, please contact your Kaltura administrator to have it enabled.
+ Add New Menu Items on a standard installation:
To explore additional creation tools, please visit The Kaltura MediaSpace User Interface.
User Menu Items on a standard installation:
To explore additional menu items, please visit The Kaltura MediaSpace User Interface.
What is My History?
My History is accessed from the user login menu and displays videos that you have viewed while signed in. This includes videos that you have watched while signed in to the KMS app or browser on a mobile device. Changes you make to your account history will appear on all devices you sign into using your account.
To view media from your history
1. Select one of the following:
- The My History tab
- My History from the User drop down Menu
- Navigate to http://{your MediaSpace url}/history.
2. Click on a video to begin watching it. A progress bar indicator displays. See Video Progress Bar.
How to clip media?
- Select a video you want to clip.
- Launch the Video Editor from the Actions drop-down menu.
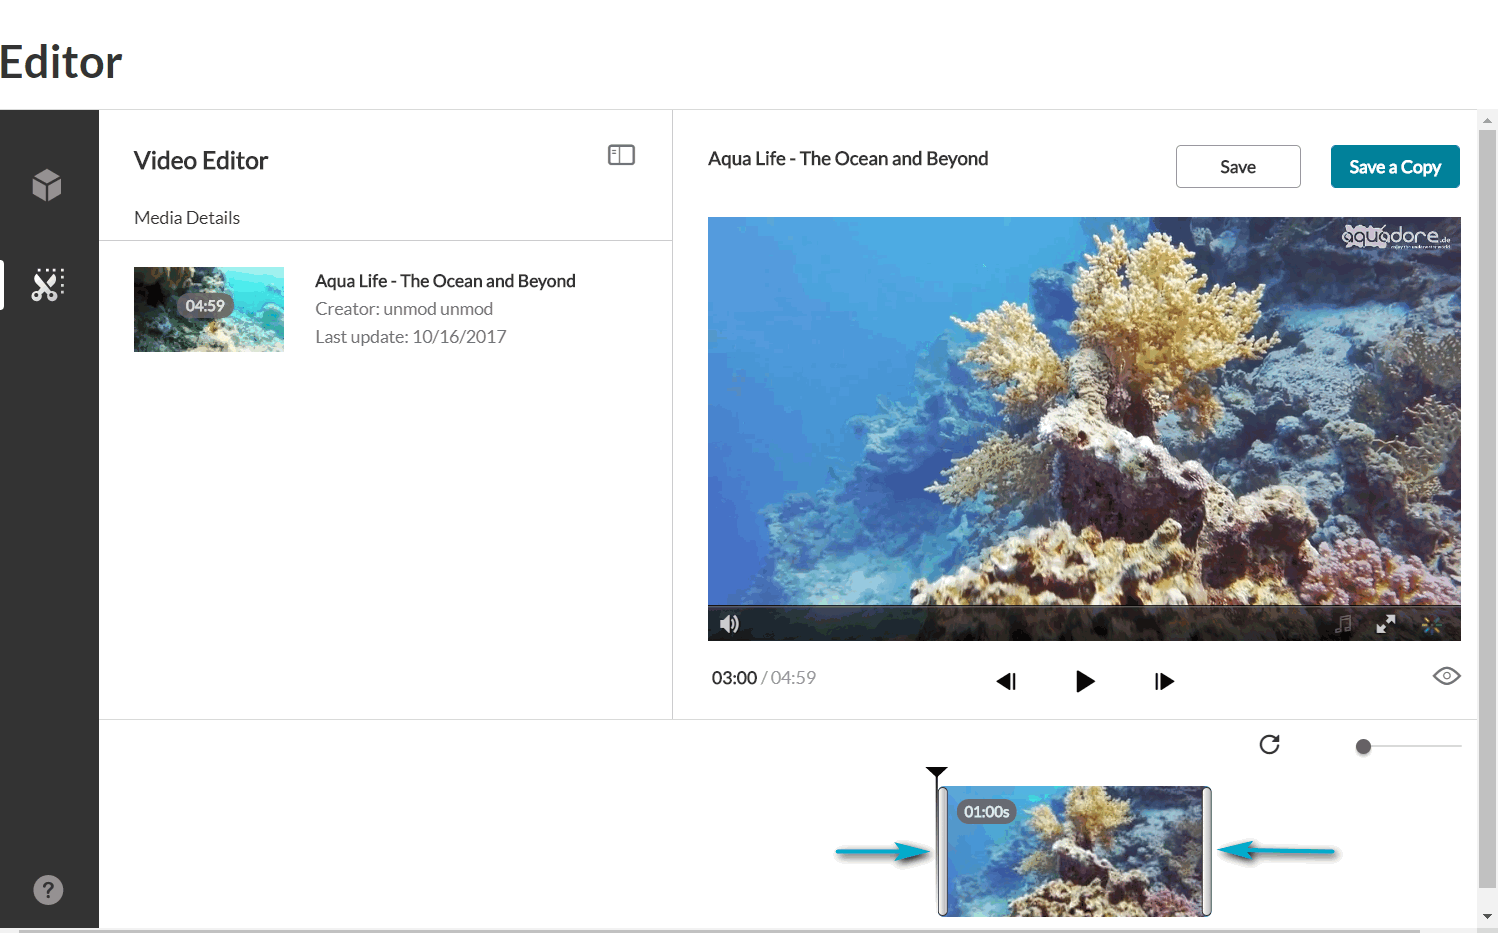
- In this example, the desired start time for the one-minute clip is at minute 3.00. Enter 0300 in the Time field and press Enter.
The Real-Time maker syncs with the input time you entered.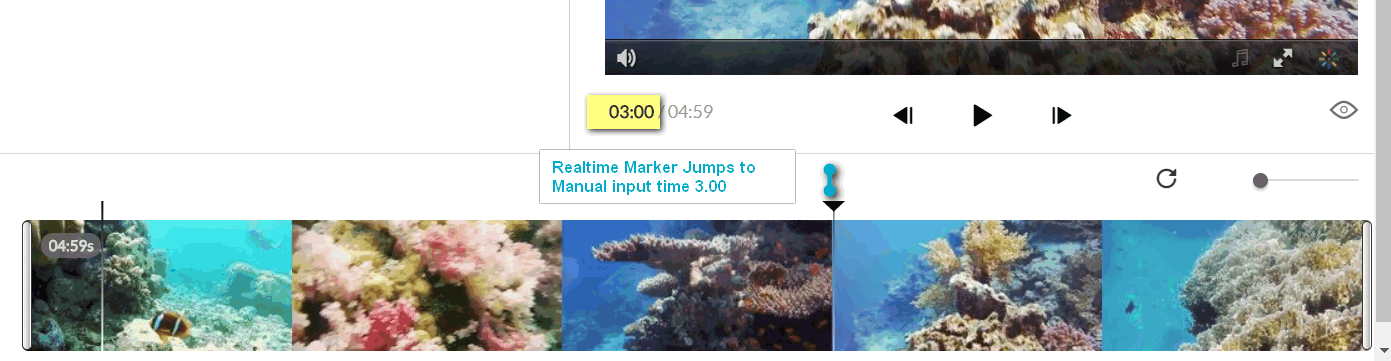
- Drag the handle bar to the start of the clip at (the 3.00 minute). The handlebar should snap to the Real Time marker. Drag the other end to the one minute time mark. You have now created a one-minute clip of the original video.
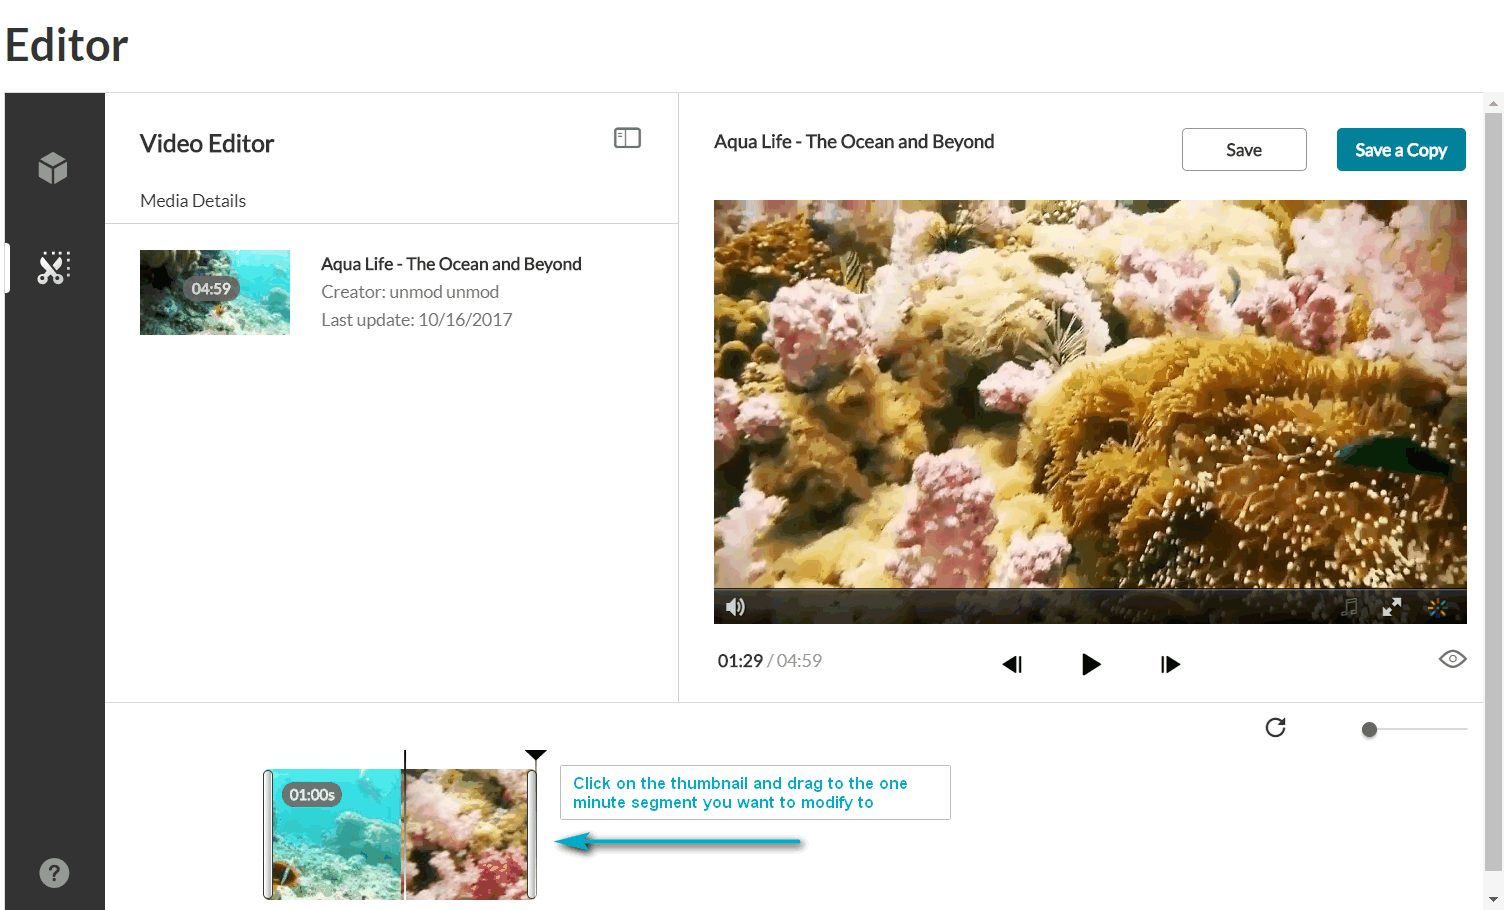
- (Optional) If you want to change the segment of the one minute clip to another (one minute) segment on the timeline, click on the thumbnail you created and drag it to the desired frame on the Timeline.
- Click Save a Copy. The following window is displayed:
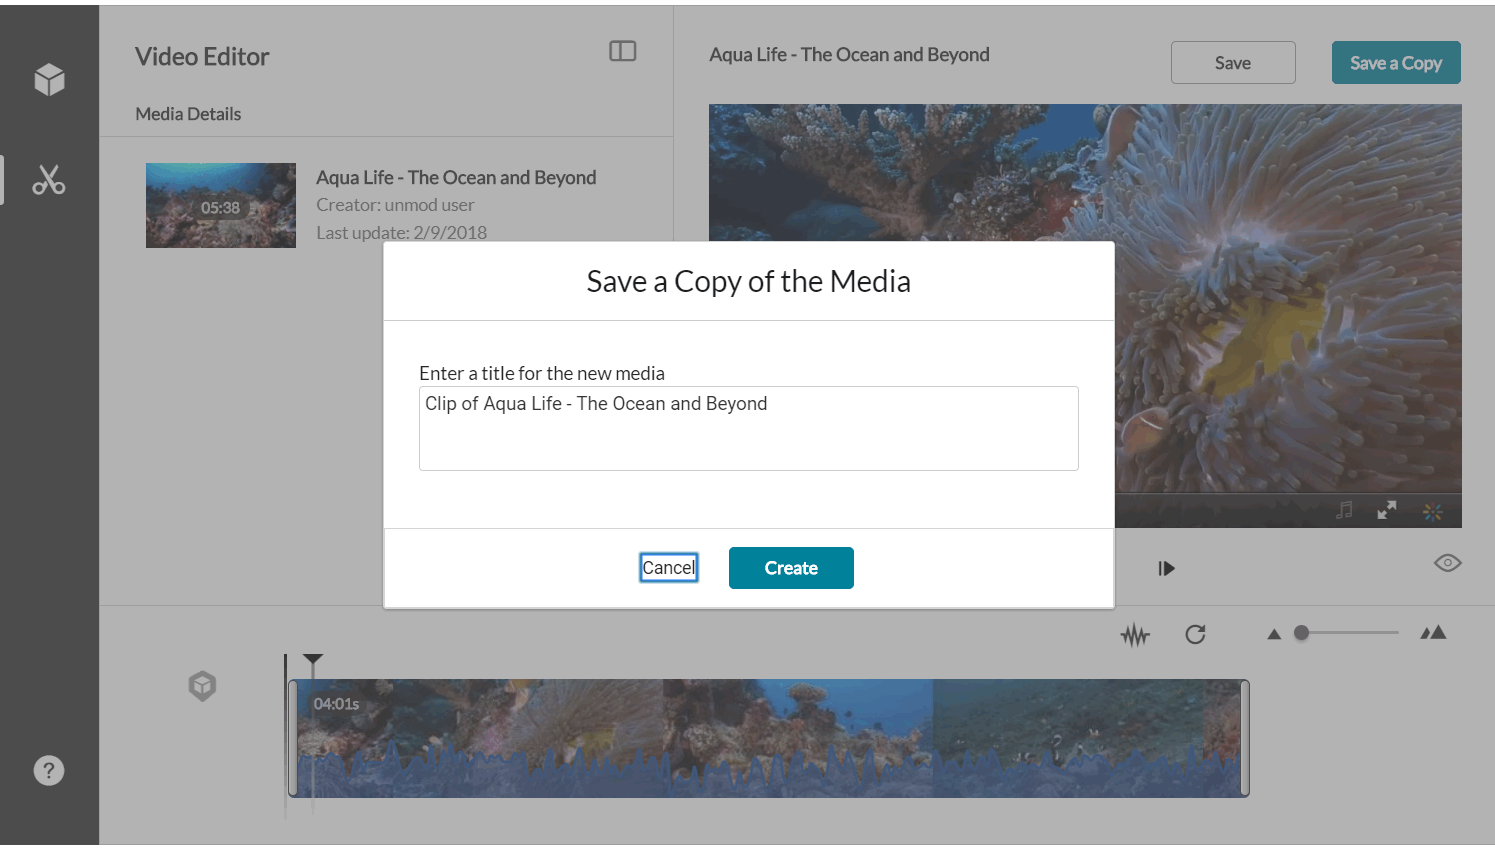
- Enter a title and click Create. You can either use the suggestion title (indicating that this video is a clip) or create a new title.
A confirmation box is displayed, and the new media appears in My Media.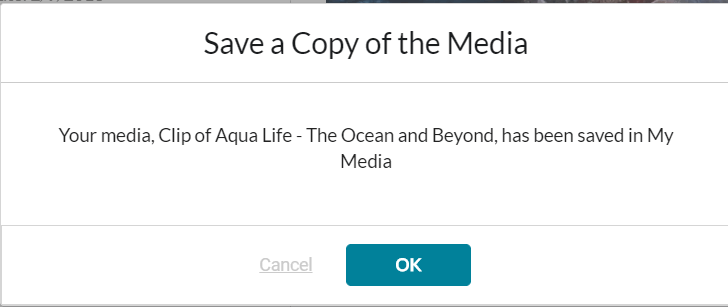
How to trim media?
- Select a video you want to trim.
- Launch the Video Editor from the Actions drop-down menu.
- In this example, the desired start time will be one minute thirty eight seconds. Drag the handlebar to the 1.38 point on the video. You can also select to input the 1:38 time manually.
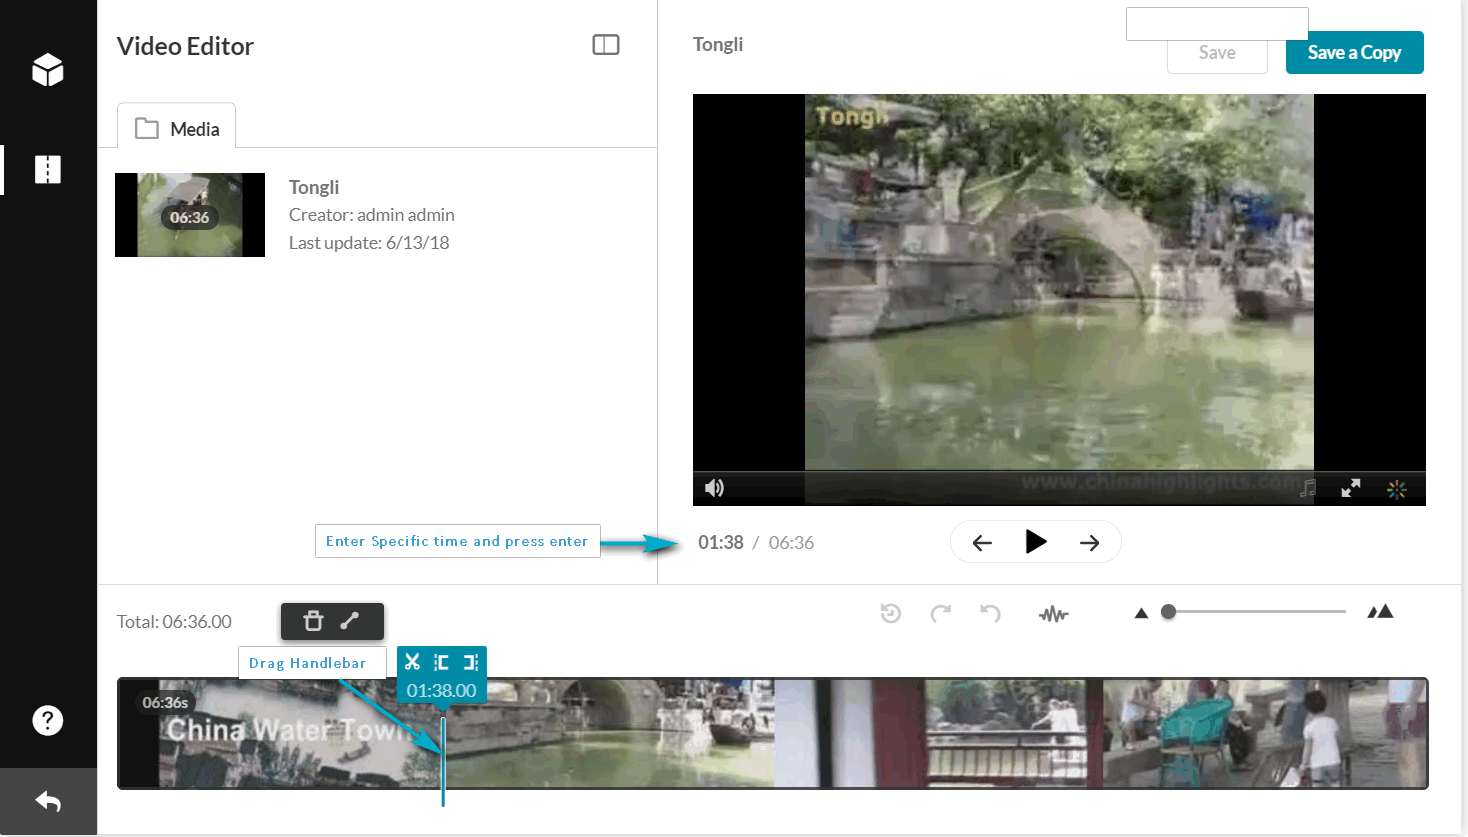
The manual input time syncs with Real-Time maker you set and vice versa. - Drag the other end to the time mark 30 seconds less prior to the end and use the manual time input as a guide to the exact time.
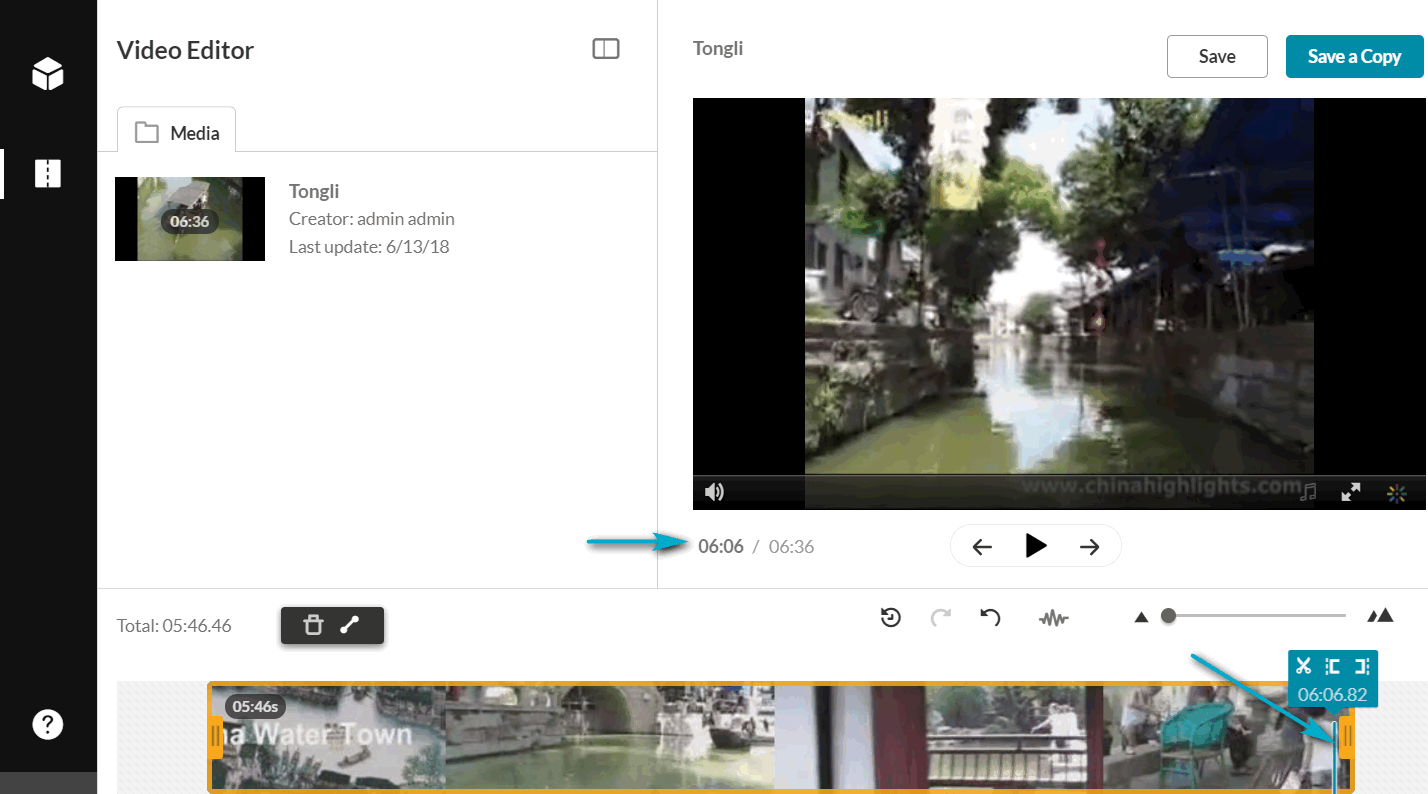
You now have the desired segment of the original video.
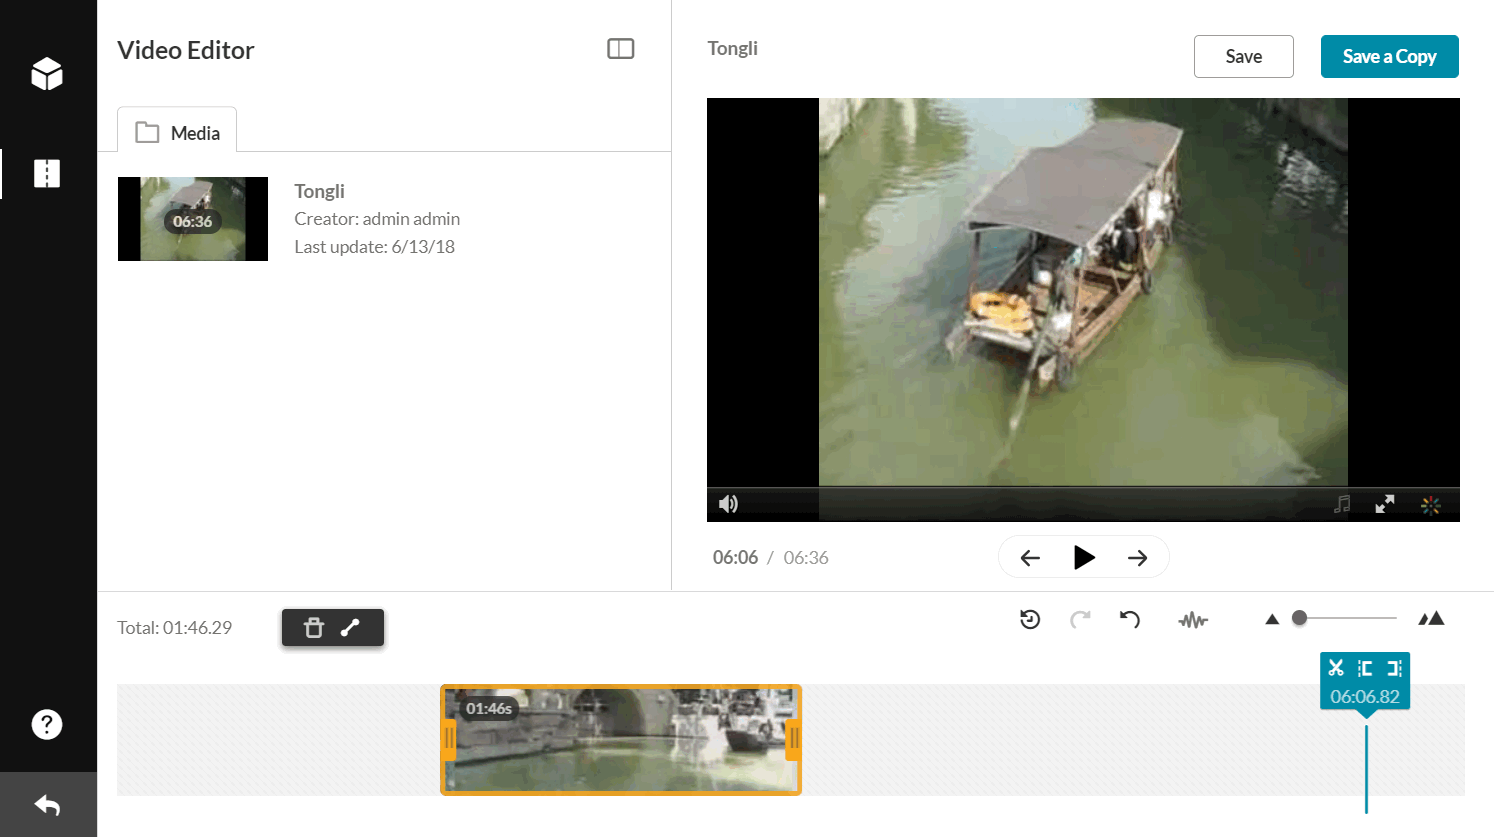
- (Optional) If you want to change the segment of the selected trimmed media to another segment on the timeline, (with the same amount of time) click on the thumbnail that you created and drag it to the desired frame on the Timeline. For example, if you want a one-minute segment, choose it and then you can move it elsewhere on the timeline.
The trimmed segment that you created for 1 minute is now on a different part of your media.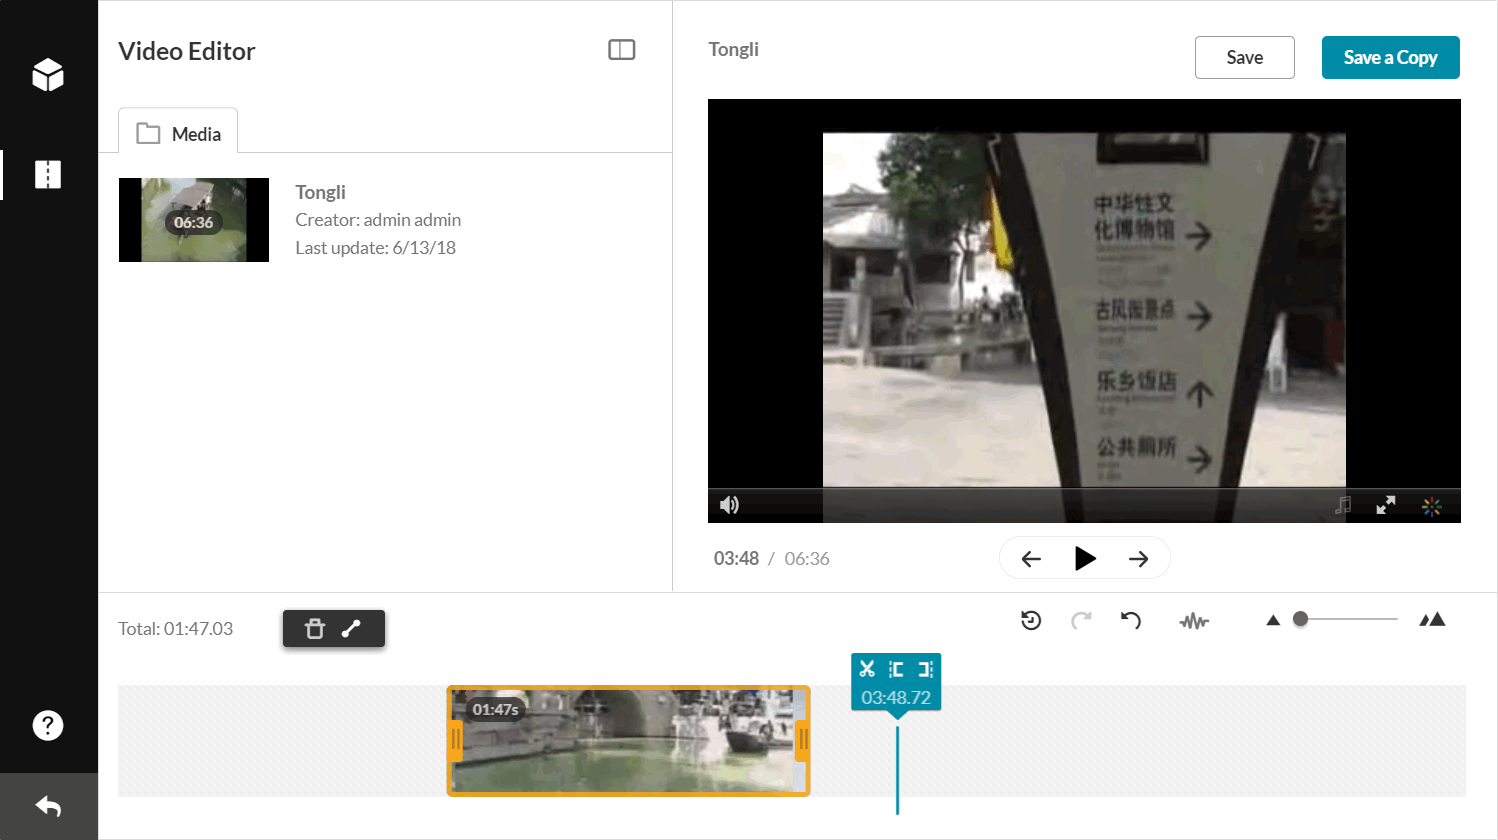
- Click Save. The following window is displayed:
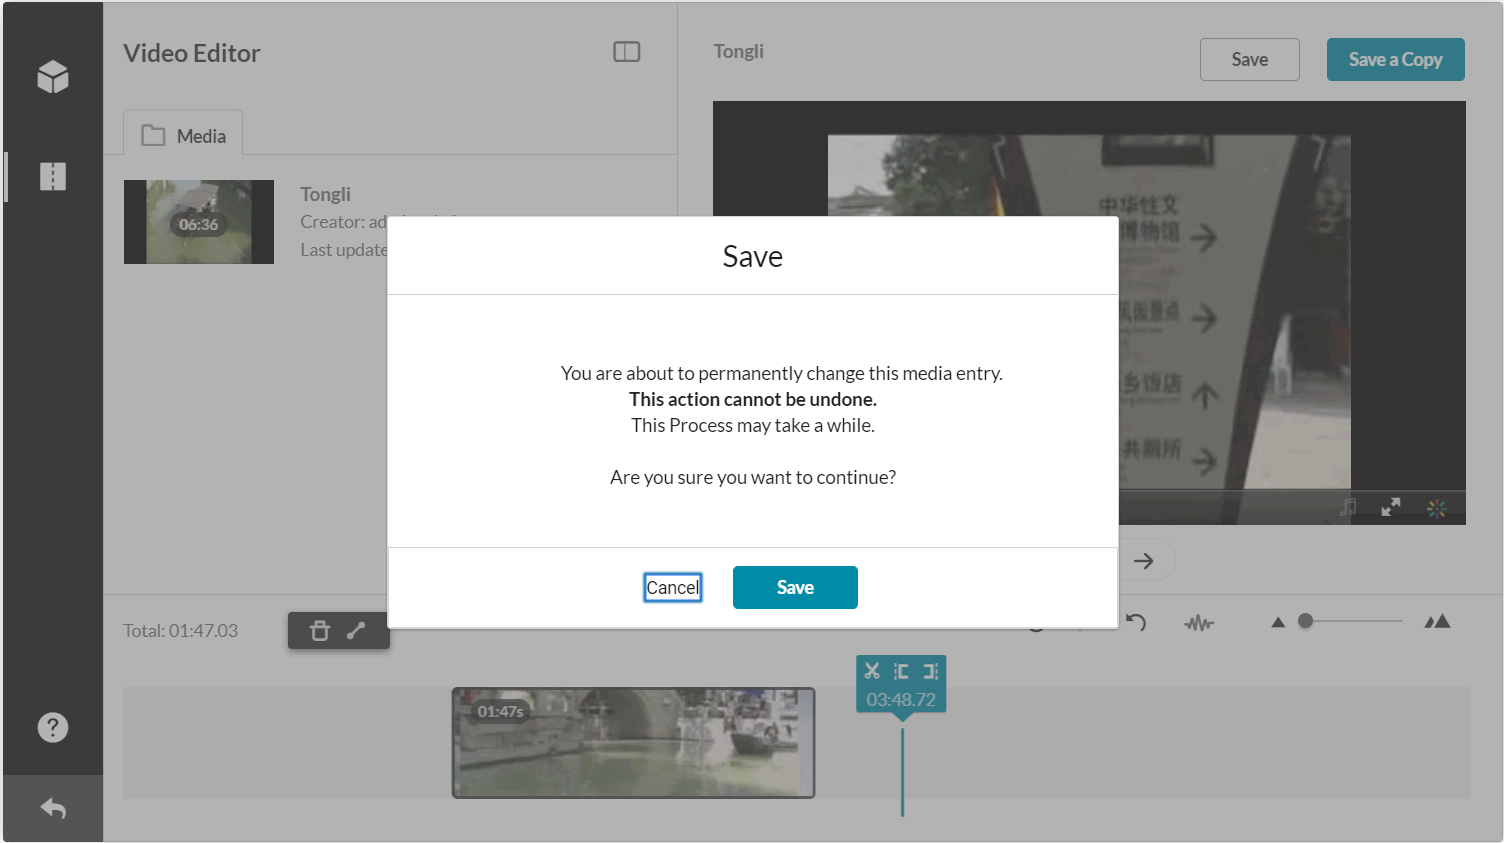
- Click Save.
A progress bar is displayed. And a message is displayed after your video is successfully saved. - Click on the Exit icon to return to My Media.
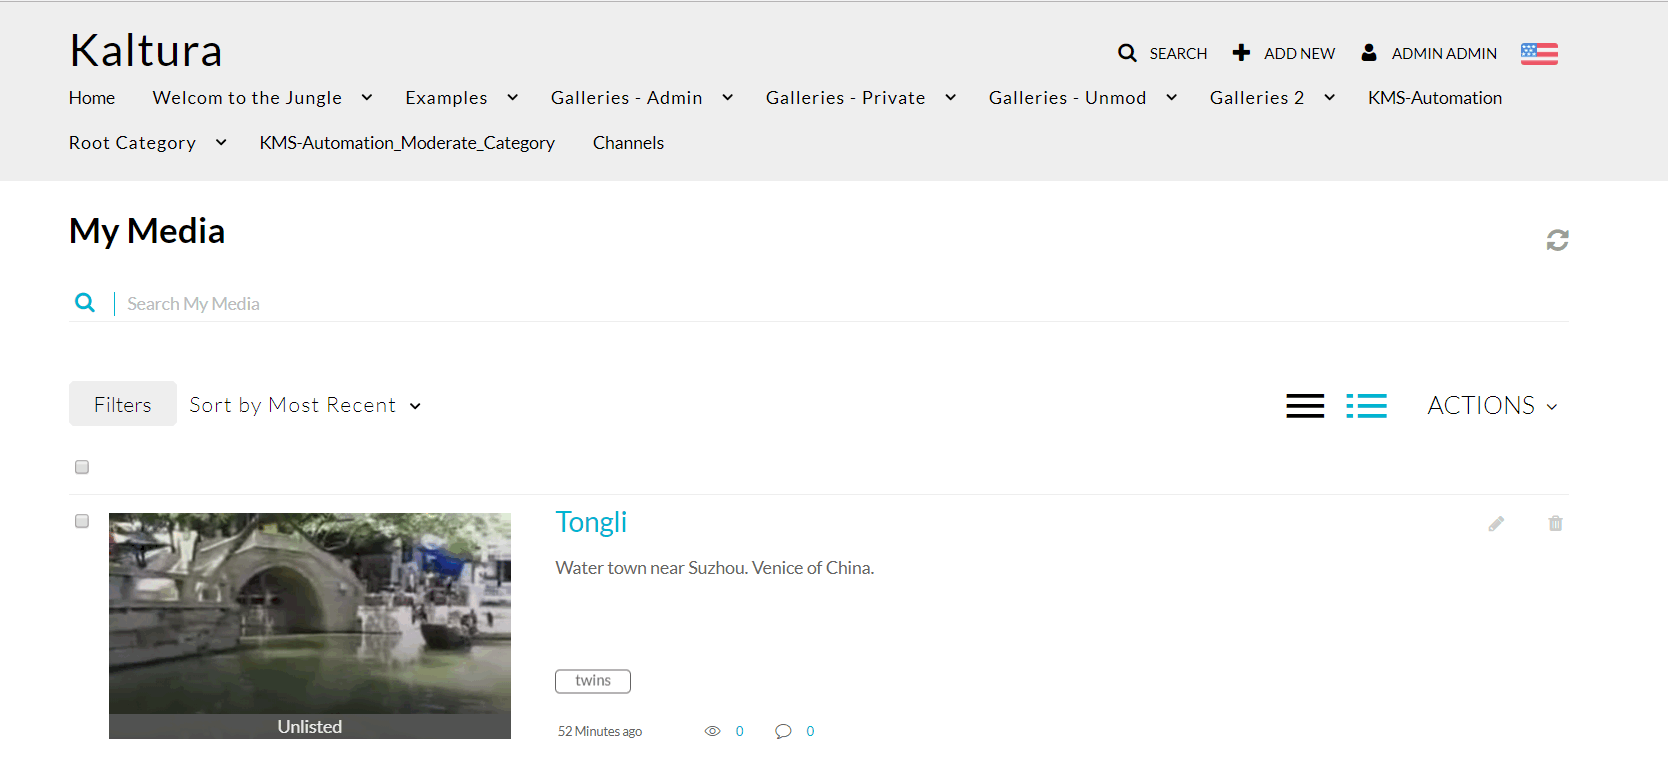
How to create a Video Quiz?
- Login to your KMS or KAF applications
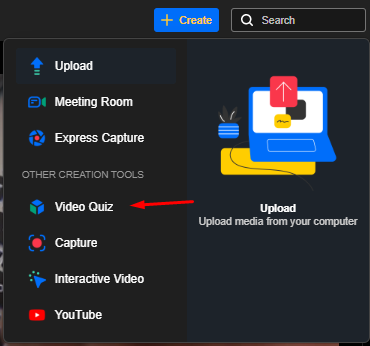
- Click +Create and select Video Quiz from the drop-down menu.
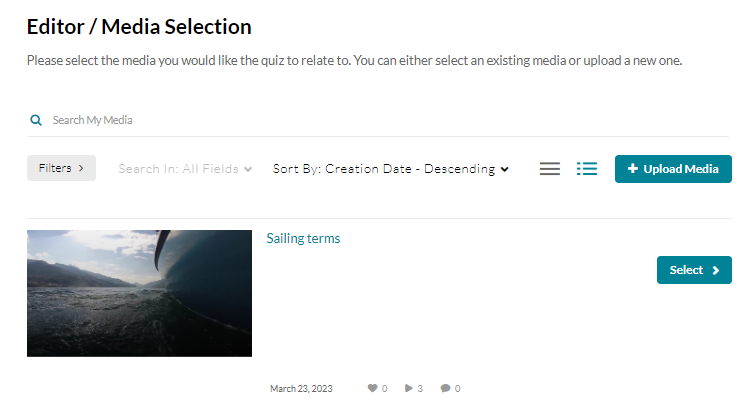
- Click Select next to an existing media you want to create a quiz from or click +Upload Media to upload a new media for your quiz.
The Editor / Media Selection page is displayed.
Note: You can create or modify a quiz from VOD, Audio and YouTube entries, but not from Live and Image entries.
The quiz editor is launched.
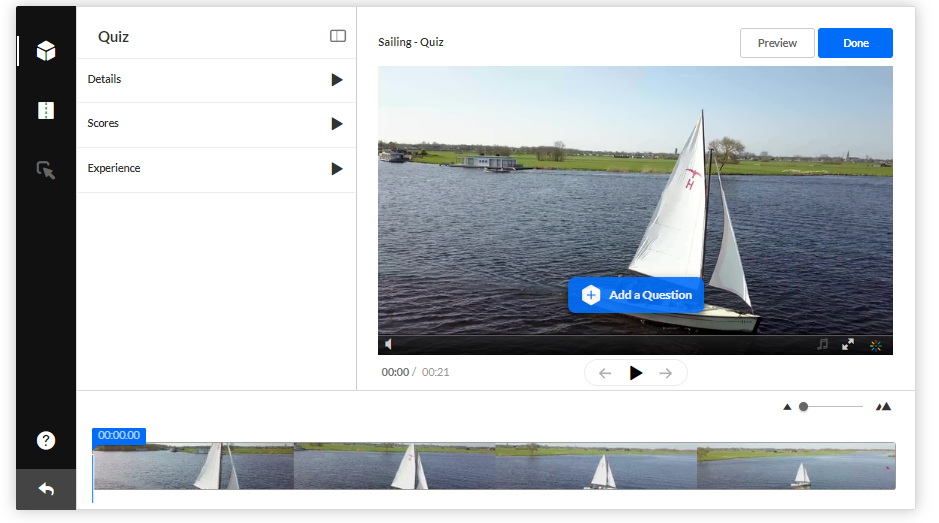
To learn more how to add questions, click here .
How do I watch my Kaltura quiz analytics?
Video quizzes are a series of questions embedded into any video in your Kaltura library. Video quizzes offer a way to make any video more engaging; they can encourage active viewing and give you a unique way to assess learning.
- From My Media, select the video for which you wish to view the analytics by clicking the video’s title. The individual video’s media page opens.
- Scroll down under the video player and click Actions.
- Select Analytics from the drop-down list.
- The Analytics Dashboard opens. Here you can view the average quiz score and viewing data.
- To view specific user’s quiz results, click the Quiz Users tab.
- To view a breakdown of scores on specific questions and their answers, click the Quiz Questions tab.
NOTE: If you have embedded your quiz on an external page rather than sharing via link or in a Canvas course, you will not have any individual user data as users aren’t made to log in to Kaltura.
Where can I find viewers responses to the Kaltura Video Quiz?
- From My Media, select the video for which you wish to view the analytics by clicking the video’s title. The individual video’s media page opens.
- Scroll down under the video player and click Actions.
- Select Analytics from the drop-down list.
- The Analytics Dashboard opens, look for the relevant tab showing the answers, which will show you the open questions posted and their answers.
Does Kaltura offer a Multi-attempt quiz?
Yes, if you do not see this option in your account, please reach out to your Kaltura administrator to enable this feature.
When creating quiz, do I edit the original file?
No, the file edited is not the original file.
You will be editing a copy of the original file, therefore the original file can still be used in a VOD capacity or serve as a base for another quiz.
What is the Interactive Video Paths?
Kaltura Interactive Video Paths enable you to add choice-based learning paths to your videos, inviting your audience to engage and participate. With Interactive Paths, you can customize your content to create a more personalized, "choose your own adventure" experience for each of your users. You can create, share and embed video paths in your website, LMS, or MediaSpace Video Portal to increase engagement, enhance learning, and boost conversion.
How to create an Interactive Video Paths project?
- Login to your KMS/KAF instance.
- Select Interactive Video from the Add New menu.
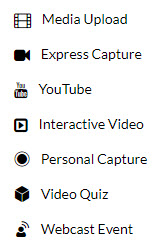
3. The Create Interactive Video window is displayed and includes two sections:
- Set Details
- Add Media
a. In the Set Details section enter a Name (required) and a Description (Optional).
b. Click on the Add Media arrow to open the My Media section.
My Media displays the media available to select to use for the Interactive Video. Click Add to videos to the Interactive Video.

4. Click Create
How to build your Interactive Video project structure?
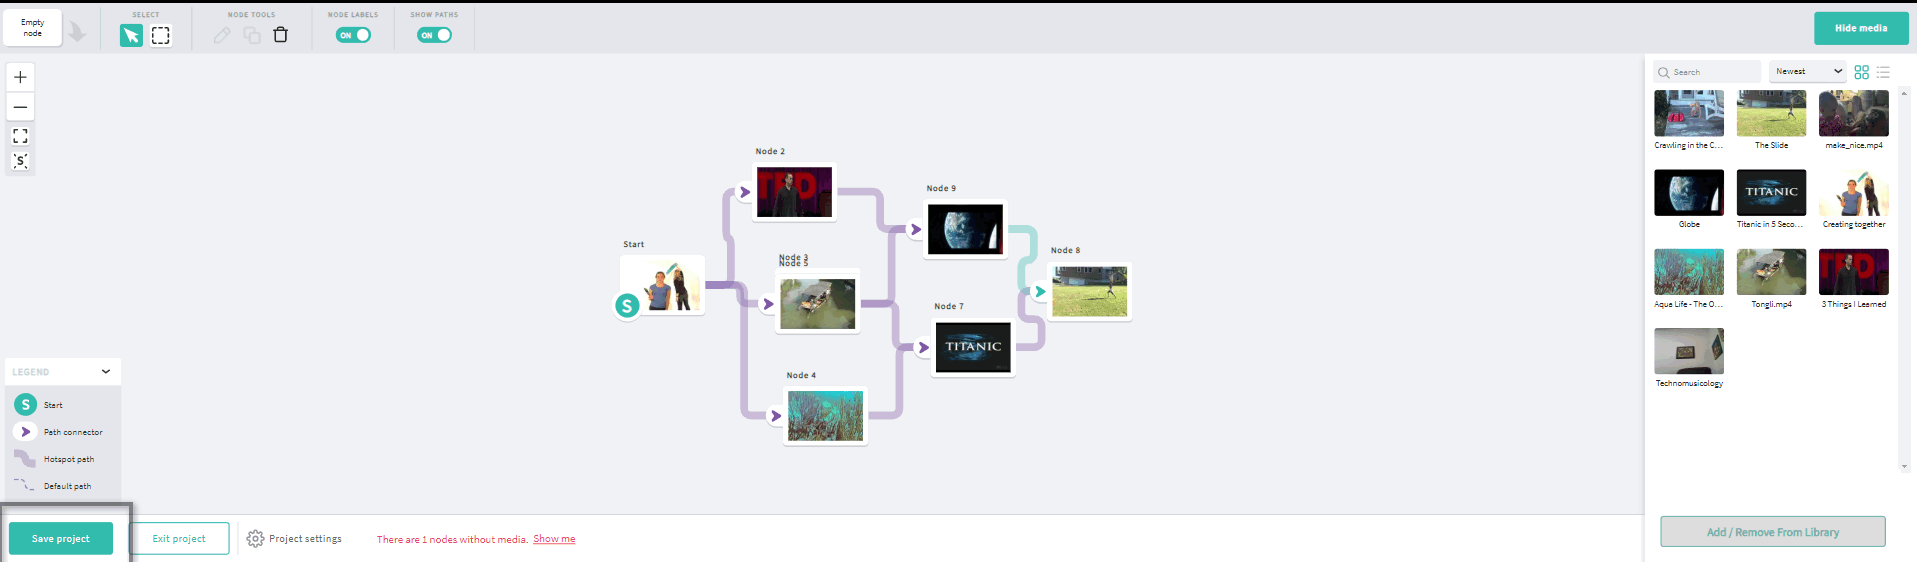
- In the Composer, click and drag empty nodes onto the node map.
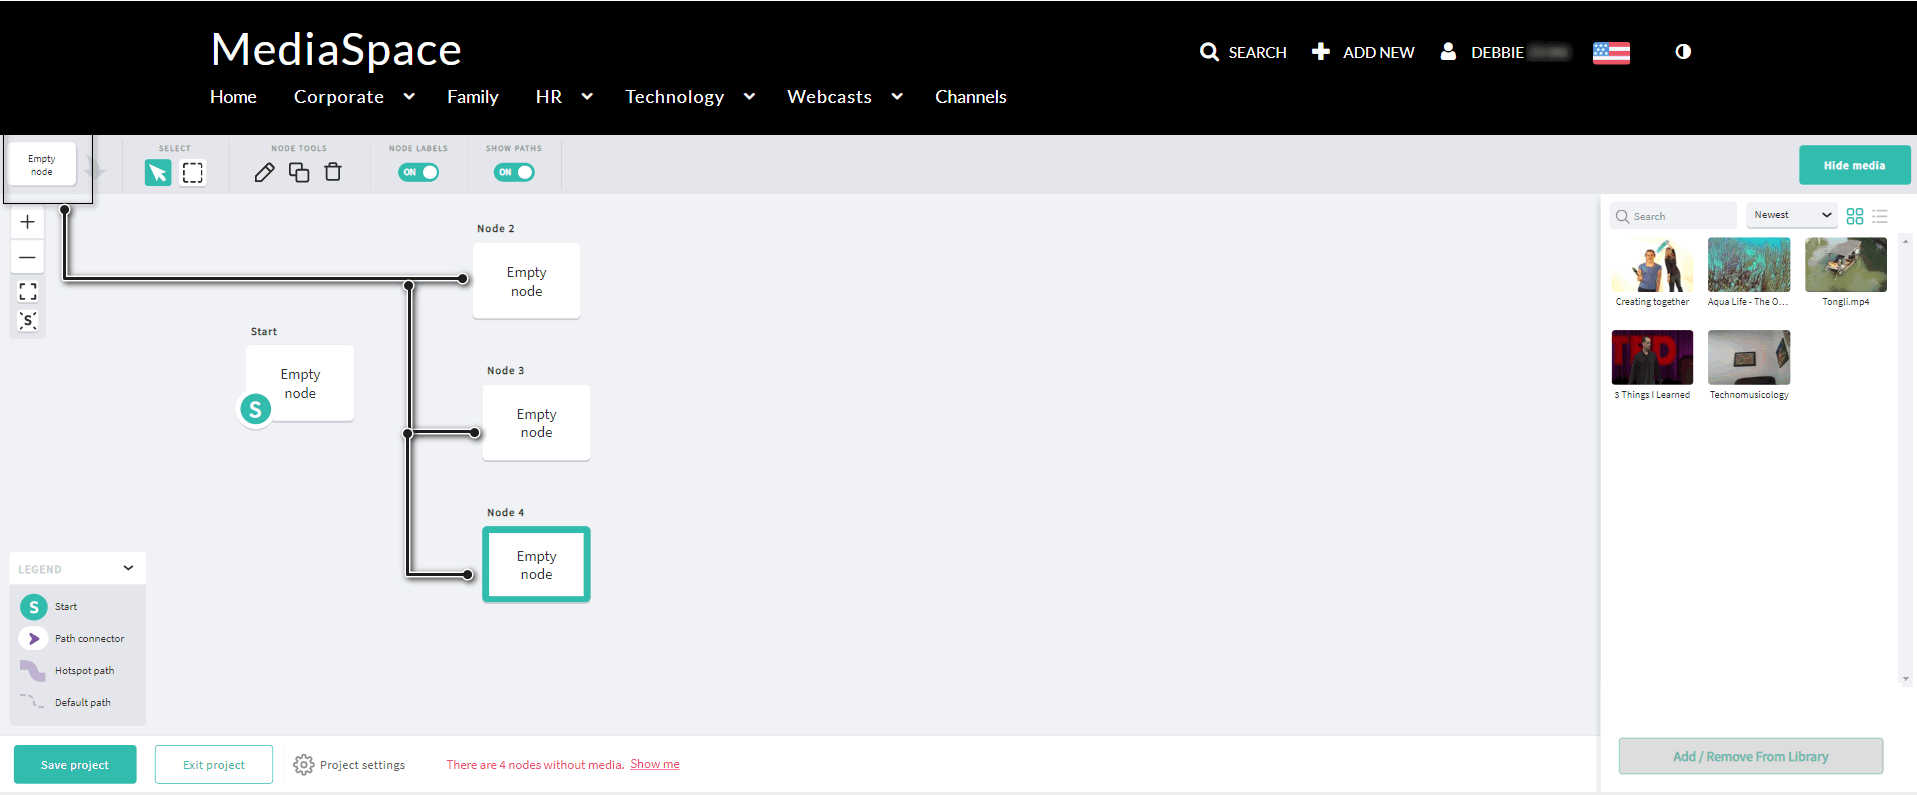
It is helpful to name the nodes something meaningful as you place them on the node map. You can edit the node name by clicking on it. This will save you time as you get deeper into the project build. - To create the paths of your video, hover over the right-hand side of each node and drag the arrow to the node or nodes it should connect to.
You can connect the node to any other node on the node map, even itself! You can also create multiple connections from one node. Every path you create will automatically add a hotspot to the origin node that can be easily styled and positioned within the node editor. - Show the Media library and drag media items onto the desired nodes.
- Double-click on a node to begin editing your hotspots. See Editing Hotspots.
How to create and Edit Hotspots?
There are two ways to create hotspots in the Kaltura Interactive Video Composer.
- You can link the video to other nodes on the node map. This dynamically generates hotspots for each connected node. See Creating Your Kaltura Interactive Video Project Structure. These hotspots will be stacked in the upper left-hand corner when you double-click into the node editor. You can edit and delete these app-generated hotspots.
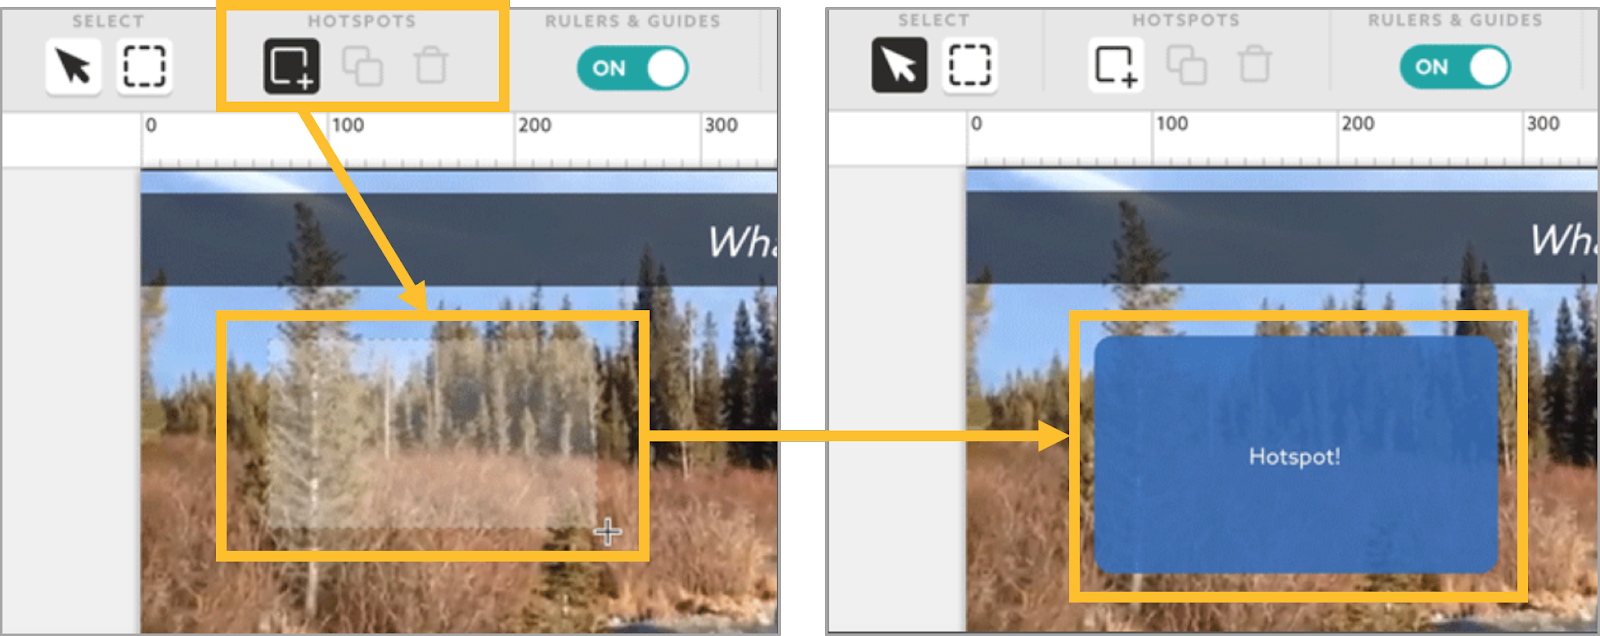
- You can manually add hotspots to your video. Double click on a node on the node map or use the hotspot tools to draw or duplicate hotspots.
To draw, click the "Draw Hotspot" icon and click and drag the hotspot onto the video.
How to Save and View Your Kaltura Interactive Video Project?
Saving Your Project
After you complete building your project within the Composer, click “Save Project” in the lower left corner of the screen to save your project in Kaltura MediaSpace™.
Viewing Your Project
- Navigate from the Kaltura Interactive Video Map/Composer to the User menu.
- Select My Media and filter the media to display Itenractive Videos. The list of the interactive videos in your Kaltura account is displayed.
- Click on the thumbnail image or the name of the interactive project. The Media Entry page is displayed. The experience will automatically begin to playback.
How do I enable the Kaltlura Express Capture?
- Login to your MediaSpace admin page.
- Locate the recorder module
- Enable the module by changing the “enabled” field to “Yes”.
- Make sure to configure the “allowedRole” matches your uploading & content creation policy.
- Save the changes and clear the cache for the changes to take effect immediately.
How to record with Express Capture?
- Select Express Capture from the + Create drop down menu.
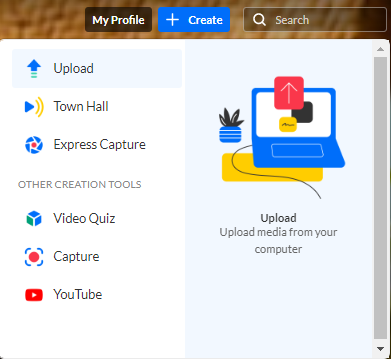
The Record Media page is displayed.

- Set the desired Screen, Camera and Audio Settings. The default settings are your personal computer's webcam and audio device.
- Click on the big red button to start the recording.

What do I need to have for the Express Capture to work?
The only thing you need to have is a V3 version player. This will automatically be done when enabling the feature in MediaSpace.
How do I test my Express Capture?
- Go to https://webrtc.github.io/samples/src/content/peerconnection/constraints
- Click “Get Media” and click Allow access to your camera.
- Wait for the stream.
If the stream on the left does not display – the browser you are using is not capable of using the camera. - Enable the camera in the browser settings.
For OS, see Use your camera & microphone in Google Chrome.
For iOS, see Customize settings for each website in Safari on Mac.
The webcam functionality in this case is due to a browser issue and not related to the Kaltura application.
Does Kaltura offer any keyboard shortcuts for the Express Capture?
For Recording:
- Start Recording/Record Again - Alt+Shift+R || ?+Option+R
- Stop Recording - Alt+Shift+S || ?+Option+S
- Pause/Un-Pause Recording - Alt+Shift+P || ?+Option+P
- Upload/Use Recording - Alt+Shift+U || ?+Option+U
For Playback:
- Depends on the use of the V3 player OR the video tag.
What is Kaltura REACH captioning?
Kaltura REACH is the Kaltura service for providing captions and enrichment services. Kaltura REACH supports captioning, transcription, translation, audio description, chaptering, in-video, and cross-library search and discovery, deep-linking capabilities, and metadata and keyword extraction.
To learn more, see Kaltura REACH.
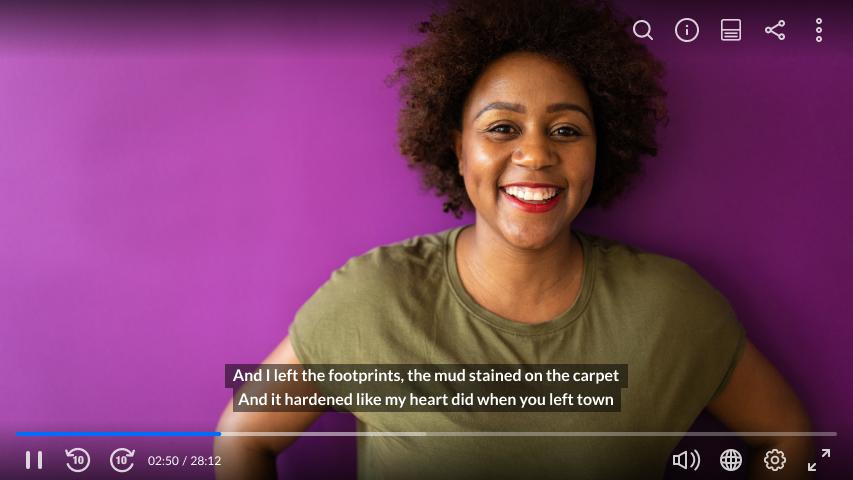
How do I show Kaltura REACH captions in MediaSpace?
To display the transcript, open the media playback page where the transcript widget will be displayed by default, select "Hide transcript" in case you wish to hide it, or "Show transcript" if you wish to show it. The transcript widget enables searching inside the video audio, seeking per line. To do so, click on "Fast forward" or "Fast rewind" and locate a particular point in the video. The text is highlighted as it's played in the video. Clicking on the captions line will play the video from the selected point. Use the search box to search for a specific string in the transcript file. When clicking on the search result, the video playback will continue from the selected point. Please note that the transcription widget also has some additional options, such as the option to download and print the transcription files.
How do I moderate captions?
To access the captions requests dashboard:
- Select service request fromthe user drop-down menu.
- To check the current credit status forthe Kaltura service orders for human caption, refer to the following items: credit expiration date, used credit, remaining credit, credit overages.
- Click "Show Details" to open the services status dashboard, the services status dashboard contains the caption, information, and status. Whether machine or human and translation requests.
- Select the requested time rangeand review the overall request statuses in a colorful graph display.
- Click on the different moderation statusesto view the statistics per each status.
- When done, click on"High Details" to close the dashboard.
- Click on "E-mail CSV" to send a CSV reportof the requested service orders to your e-mail.
The caption moderation dashboard includes a moderation section, which details a list of orders whose approval are pending. Here, you can either approve or reject a pending request. The request list is automatically sorted to present the pending moderation requests.
- To show more details,click the arrow next to the service request.
- To approve or reject a service order,check the box next to the order, then click on "Approve" or "Reject".
- A confirmation message is displayed to confirm your selection.
- Use the filters option to filter requests and orders.
The number of requests is also displayed here. You can filter your order requests by Source Language. Select the language from the drop-down menu.
Service type, turnaround time or TAT, feature, status, date created. You must enter the from and to values. Checking all requests under each filtering option will show the total requests.
Select "Show More" to see more information. Remember that the service dashboard is not only available in media space but also accessible through the top navigation bar of the Kaltura Management Console.
How do I order Kaltura REACH captions?
- Select My Media and then select the media (click the checkbox to select). You may select more than one media entry.
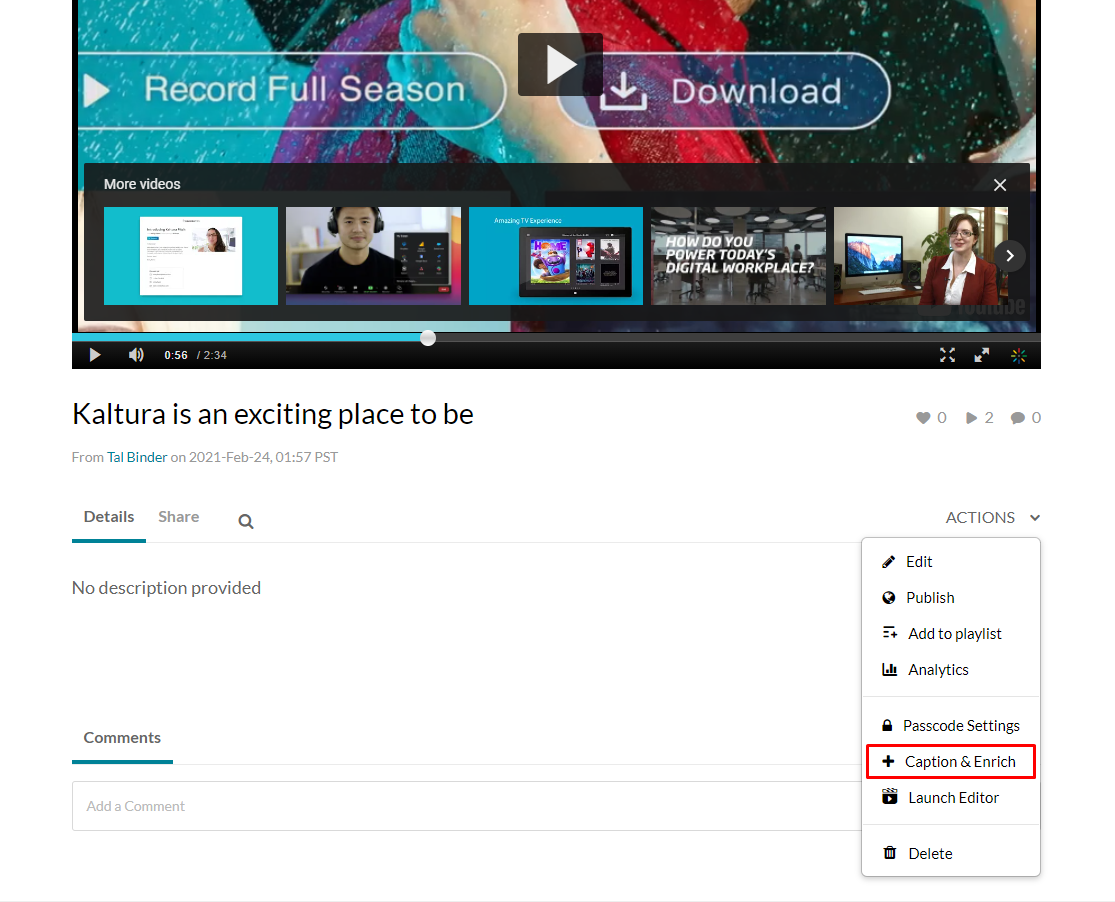
- Select Caption & Enrich from the Actions menu.
- Select the desired Service, Source Media Language, Feature and click Submit.
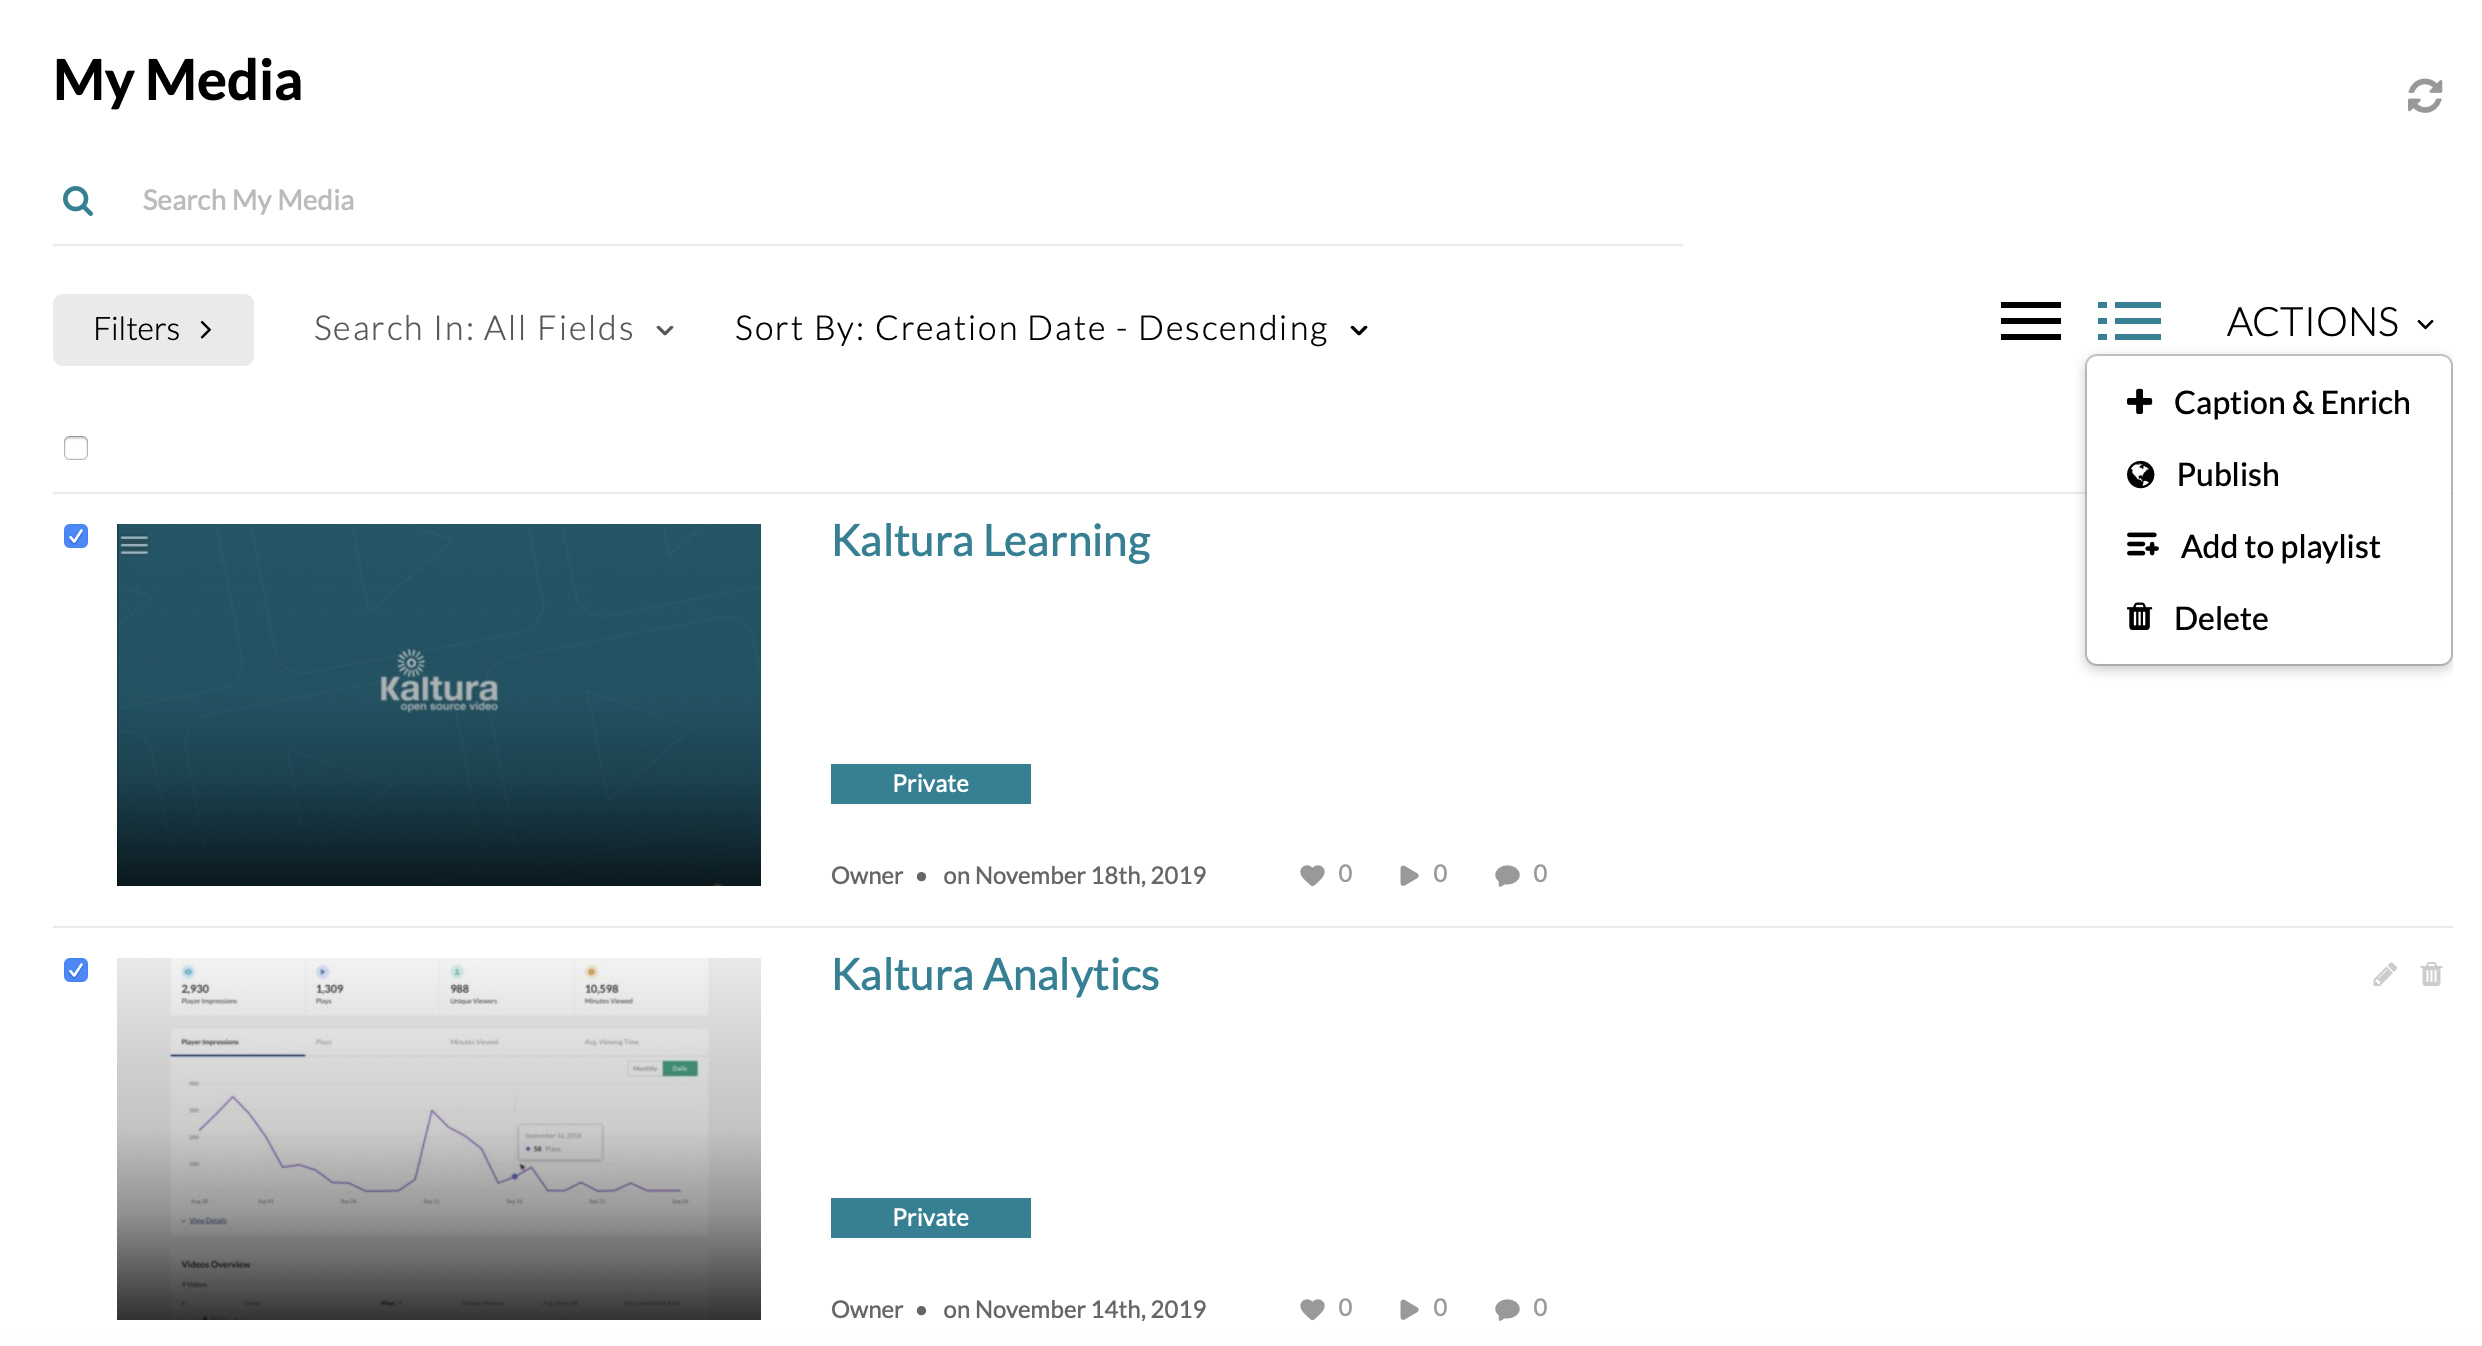
The following screen is displayed.
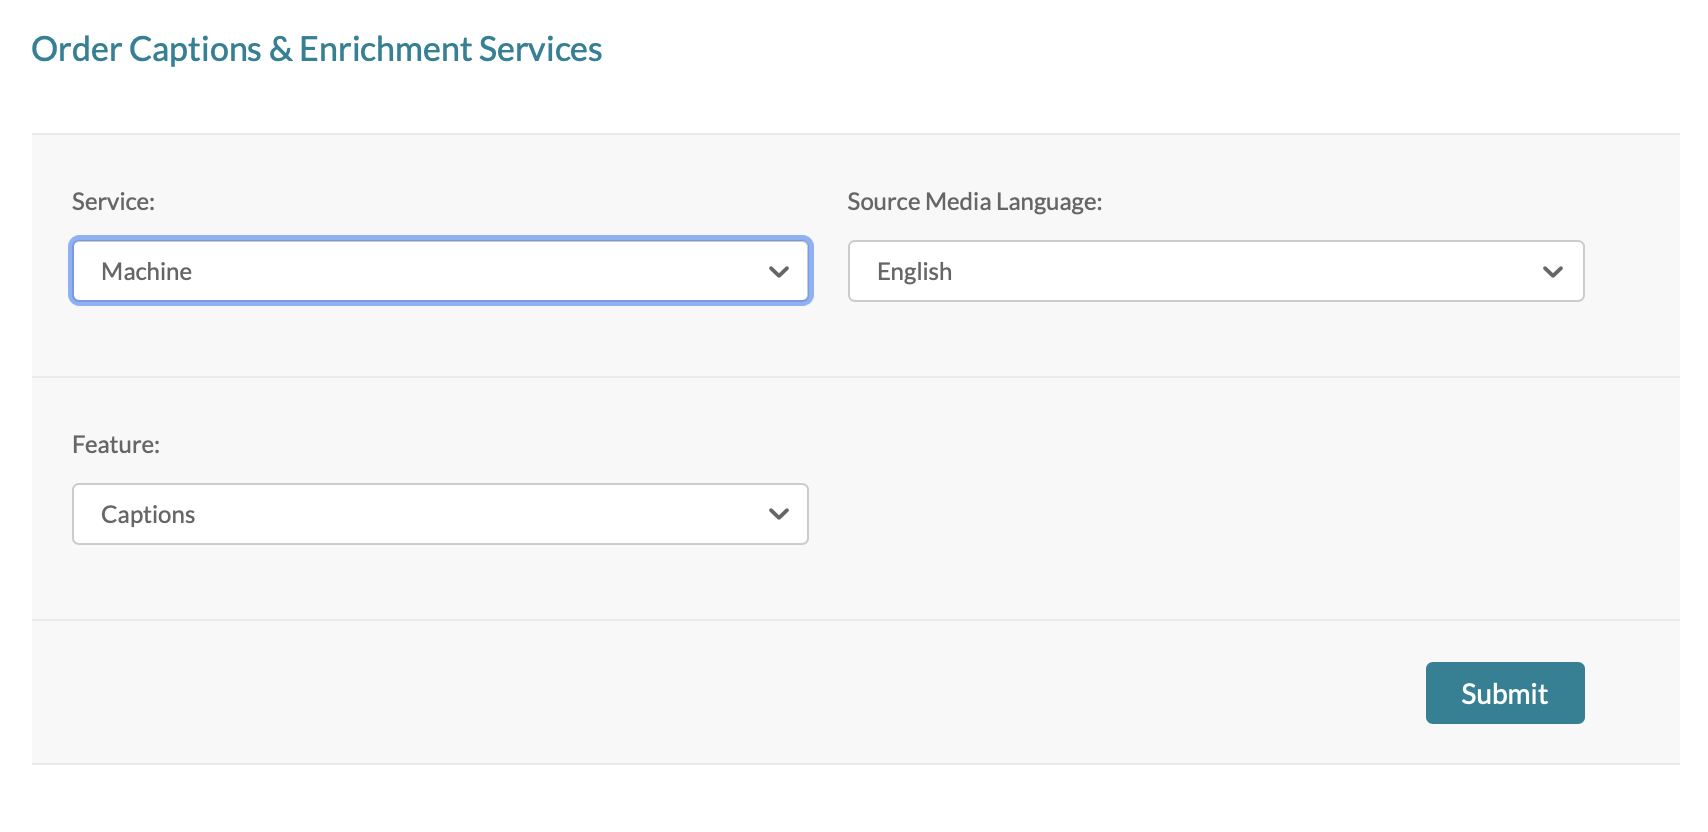
To learn more, visit this user guide.
How do I edit Kaltura REACH captions?
- Go to My Media and select a media entry with captions.
- Select Caption & Enrich from the Actions drop-down menu.
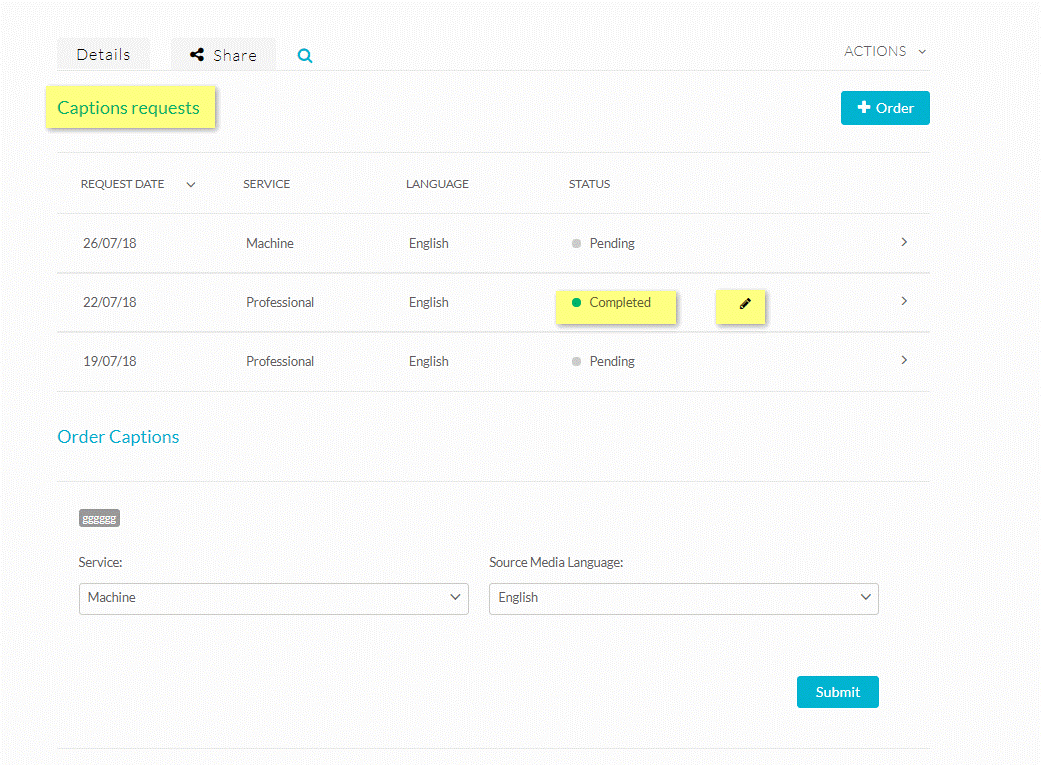
- Click on the Edit icon to open the Editor. The Editor is displayed.
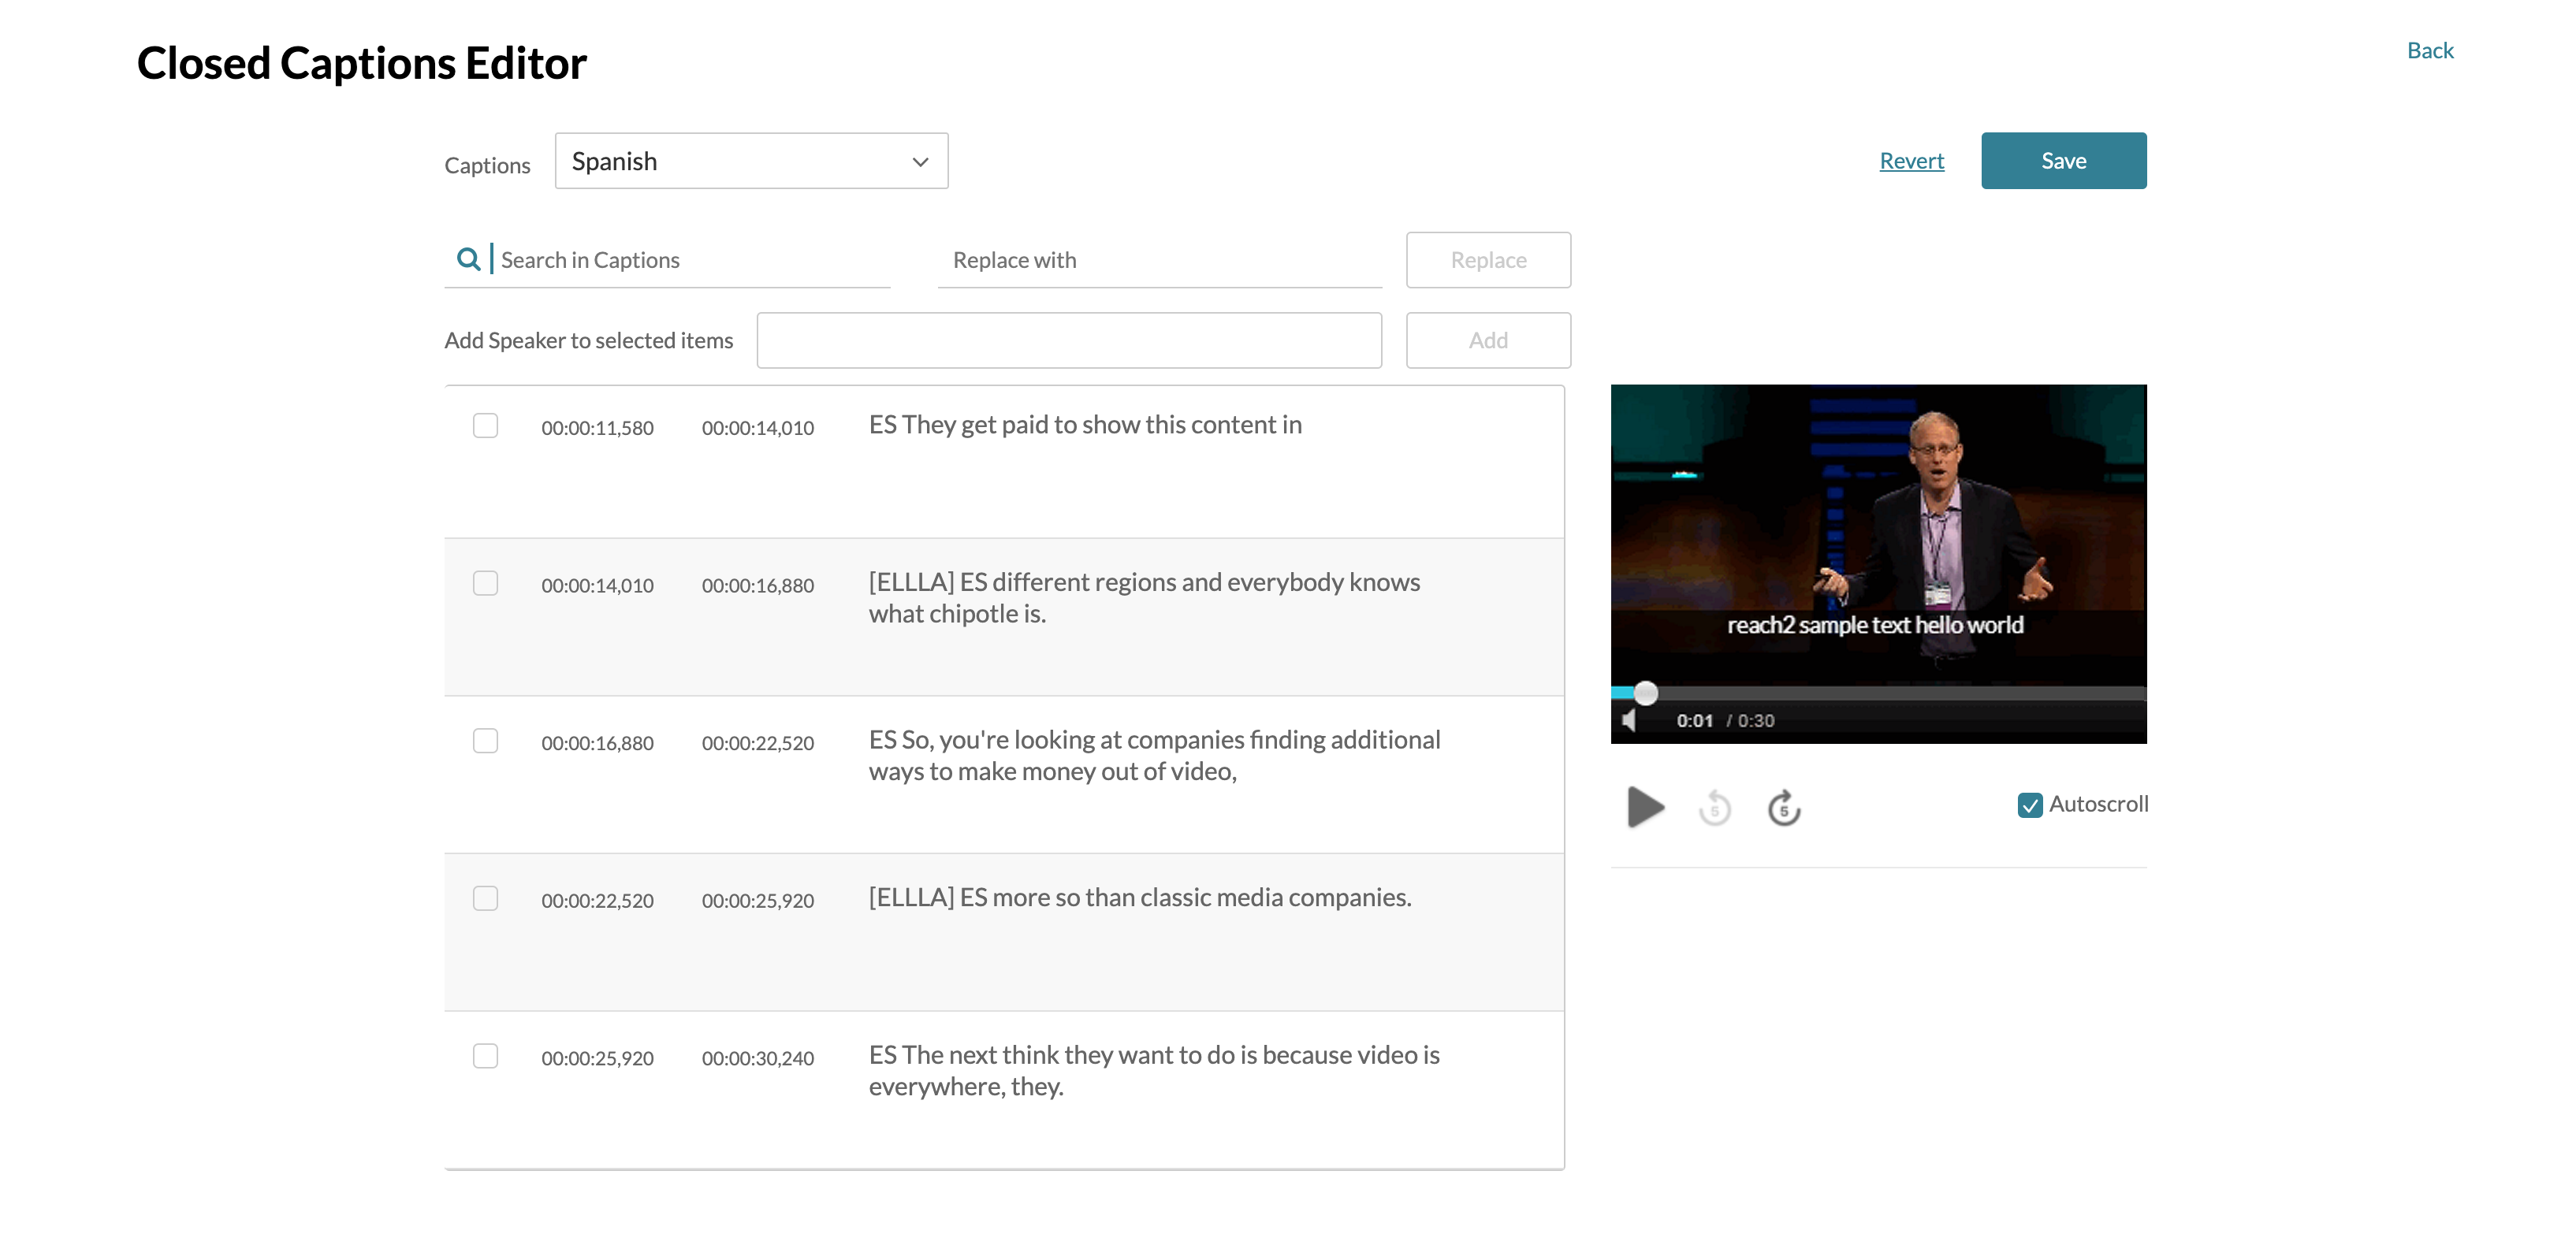
The Captions Request table is displayed with all existing caption requests.
How much time it takes for captions to be ready?
Human based captions in English has a Turnaround times ranging between 3 to 48 hours according to your needs and system configuration.
With ASR the captions will be completed in less than 30 minutes if the video is shorter than 15 minutes and double the time of the video if longer than 15 minutes.